| Eheim Classic | Penn Plax Cascade | Fluval 06 Series | Fluval FX Series |
 |
 |
 |
 |
| 5 Stage Filtration | 3-5 Stage Filtration | 4 Stage Filtration | 4 Stage Filtration |
| Lifetime: 4+ Years |
Lifetime: 3+ Years |
Lifetime: 5+ Years |
Lifetime: 5+ Years |
| Price: $$ | Price: $ | Price: $$$ | Price: $$$$ |
| View On Amazon | View On Amazon | View On Amazon | View On Amazon |
| Jump To Review | Jump To Review | Jump To Review | Jump To Review |
Finding the best canister filter for your aquarium is one of the most important steps you will take. Unlike other filters, which only perform minor filtration, canister filters can go as far as housing beneficial bacteria, breaking down harmful chemicals that cannot be filtered out using conventional means. Combined with their extreme strength and silent operation, a high quality canister filter will easily help create a resilient tank with crystal clear water. A few features you many canister filters look for are
- Easy cleaning
- Long lifetime
- Reasonable costs
- Good warranties
- low cost repairs
- quiet operation
Here’s a Quick Rundown of each filter
The Eheim Classic is a high strength canister filter with great customer support. It has the most filtration stages, which limits the tank size it can support to 92 gallons max. It can take awhile to set up but is well worth the time investment. If you are willing to learn how to use this filter and do not have a massive tank, the Eheim will bring much more bang per buck than any other canister filter.
The Penn Plax Cascade canister filter is a low cost canister filter with varying filtration stages depending on the size chosen. The footing feels a bit cheap, however the body is strong and its provided tubes and flow control valves are clearly well made. The Penn Plax runs almost as quiet as its more expensive counterparts and offers powerful filtration, however its impeller may not last as long as the competition. Repairing it is fairly cheap, and clean up is quick and easy.
The Fluval 06 Series is a higher cost, high strength canister filter. It is extremely easy to clean, very quiet and consistent. The 06 series is the easiest to set up and keep maintained of all the canister filters.
The Fluval FX Series is a high cost, large tank canister filter. Both the impeller and motor go well beyond other canister filters, even going as far as having a custom circuit board near the impeller just to ensure the pressure is not so high that it causes noise/stress. While it takes awhile to open due to eight knobs on the top, it is very easy to drain and clean and can be done in a few minutes once you have some experience.
Now for the full reviews.
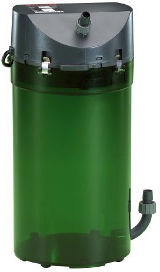
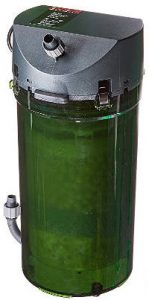
Eheim Classic Canister Filter
| Tank Size | Filtration Stages |
Noise Level | Longevity | Price |
| 40-92 Gallons | 5 | Low | 4+ Years | Medium |
The more I write about aquarium equipment the more I sound like an Eheim fan boy. Either way this canister filter packs a lot of power, carries tons of filtration media (all of which is provided) and has excellent customer service. It runs just as much as any canister filter you would find in store, yet it works just as well as filters twice its price.
Simply put if your tank is under 100 gallons and you do not mind putting in a bit of initial set-up work the Eheim Classic canister filter is the best canister filter you can find.
Dimensions
- Eheim 150/40 gal
- Height: 11.4″
- Diameter: 4.33″
- Eheim 250/66 gal
- Height: 13.97″
- Diameter: 6.3″
- Eheim 350/92 gal
- Height: 14.56″
- Diameter: 7.28″
Set-up
With this filter I highly suggest watching the video, as words are not always enough when it comes to the Eheim Canister filter.
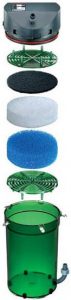
To start out you will need to open up the filter and take out everything inside of it. This will be two plastic screens to keep the media inside the filter, three different types of filter foam, two bags of biological media and a cardboard protector. Toss the bags and cardboard protector, but keep the bio-media separate. Rinse off each piece of the filter and the put them all back into the filter. They should be in this order from bottom to top:
- Plastic screen with pegs facing down
- White Filter Media
- Large bio-media
- Blue Filter Media
- Small bio-media
- Carbon Filter pad
- Plastic screen with pegs facing up
When placing each bio-media into the filter you will need to shake the filter to make them evenly spread. Once you have filled the canister filter clip the top back on. Next check the J-tube on the bottom of the canister filter. This may not be as tight as it needs to be, either from the manufacturer or shipping. Twist it until it is secure/has a good amount of resistance.
Next you will need to use the two provided tubes to connect the canister filter to its intake and output, which is done using 5/8″ and 1/2″ tubing. The 5/8″ tubing is referred to as 594 and the 1/2″ tubing is referred to as 494 by Eheim. For the 1/2″ tubing you should cut off a 2″ and 4″ piece. These will be used to connect the spray bar and double tap assembly. You may connect the spray bar assembly to the separate green J-tube now using the 2″ piece of 1/2″ tubing.
Next use the 4 inches of 1/2″ tubing to connect the double tap connecters to the J-tube located at the bottom of the filter.
Now you will measure how much tubing you will need to connect both the intake and output tubes to the tank. To do this you should place the filter in its final home or somewhere close to it. Simply connect the tube to the filter and hold it in place next to the intake strainer/spray bar assembly. Add about 2-3 inches of slack and cut the tubing for a perfect fit. You can run the filter without cutting these tubes, however it will negatively affect your flow rate.
Use the provided suction cups to affix the intake strainer and spray bar assembly to the tank. They are fairly strong suction cups, so you wont have to worry about them coming off.
With everything connected and put into place you simply need to prime the filter. First double check all your connections and ensure the lock nuts have been twisted tight. These will keep the tubes in place and prevent any leaks. To prime the filter you will need to disconnect the tube from the spray bar assembly and open up all the double tap connectors. This is done by turning the grey valves. With that all taken care of you will need to apply suction to the tubing that connects to the spray bar. This will start filling the canister filter with water from the tank and expelling the air. If they spray bar is submerged this will make a fair amount of bubbles in the tank. Once the air is out of the canister filter you can plug in the filter. While this is happening reconnect the tube to the spray bar assembly.
That’s it, filters set up.
Cleaning
Eheim Recommends cleaning the filter no sooner than 8 weeks after set up. Doing so will severely slow down the beneficial bacteria’s growth.
To start simply unplug the filter and close all of the valves on both double tap connecters. This is done by turning the valves to be perpendicular to the tubes. Once this is all done you can unscrew the doubletap connecters in the middle, separating the filter from most of the tubing. These will have a small amount of water, maybe a tablespoons worth, so have something to catch it. With the filter disconnected you can haul it off to wherever you want to clean it at. I typically choose the bathroom. It will be somewhat heavy, as it is full of water.
With the filter somewhere where spilling water isn’t an issue you will want to remove the top. To do this you must open the top double tap connector valve. If you don’t there will be a strong airtight seal keeping the top stuck in place. Undo the clips on the top and pull it off next.
Take out the top plastic screen and filter foam out of the filter. You will either rinse or replace the filter media at your own discretion. Next you will need to scoop out the bio media, you can do this by hand or with a cup. You may be able to pout it through a strainer, however when I tried this all of the bio-media came out and got mixed up. Not too big of an issue but not ideal.
Remove the blue filter pad and second layer of bio-media in the same way, followed by the white filter pad and bottom plastic screen. You may remove water at any time. I typically get rid of all the canister filter water, as it can get really dirty.
You can now lightly rinse all of your media with tank water only. Tap water will kill any beneficial bacteria, so avoid using it on the media. The body can then be rinsed out and wiped down with a cloth. You may also replace about 60-70% of your bio-media if you like. This will make the tank cleaner however you will need to do slightly more water changes as the beneficial bacteria from the old bio-media seeds into the new bio-media.
Finally take a look at the top of the filter. This is where the motor and impeller are housed. Make sure you clean this part too, as a stressed impeller will have a much shorter lifetime. With no impeller the canister filter will not work.
Now you can put the filter back together and put it back in place. You may also fill the canister with water to prevent the air draining process again, however this is optional. I do not refill mine, as it is much easier to put in place while empty. Reconnect the filter and thread the lock nuts so that they are tight. Once that is done you can open up the double tap connector valves, done by turning them to be parallel to the tubes, and plug the filter back in. You are now done cleaning the canister filter.
Warranty & Lifetime
The Eheim Classic external canister filter comes with a one year warranty and excellent customer service. They will help you with any issue you may have, even when out of warranty. If however you need a replacement part you may have to pay a bit to ship it. Still this is much cheaper than buying a new part or new filter, and Eheim will make sure you get the right part for your exact model.
Canister filters are run by an impeller and gravity. As we can’t break gravity, the only component in danger is the impeller. If you clean the filter out once or twice a year you should easily see over four years of lifetime. Once a part breaks you can simply have it replaced for a fraction of the cost of a new filter. Overall I would say you can expect to spend $20 every two or three years after the initial four years.
The only other part some users have had trouble with that I personally haven’t seen is the O ring, which forms the seal between the canister filters body and motor. As long as you do not allow this to dry in a hot area and warp and prevent it from being cut you should have no issues with it. Otherwise it can also be replaced by contacting Eheim.
Overall: This is a medium cost filter that performs as well as the more expensive filters. It is a bit of a hassle to set up and clean, however you will only do this a few times (2-4) a year.
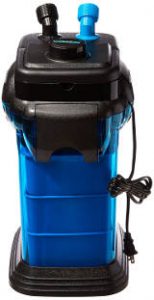
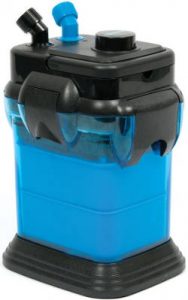
Penn Plax Cascade Canister Filter
| Tank Size | Filtration Stages |
Noise Level | Longevity | Price |
| 30-200 Gallons | 3-5 | Low | 3-5 Years | Medium-Low |
Despite being the budget choice for canister filters, the Penn Plax Cascade canister filter still makes my list for best canister filters. It runs fairly quietly, completely inaudible when under the tank in a bedroom, while still bringing significantly more power than any non canister filter. It comes with everything you need to set up the filter, however no mounting device which leave it looking a bit sloppy.
Set-up
First you will need to pick a spot for the canister filter. For bedrooms I recommend under the tank in a cabinet, however in any other room the noise will be so low that it is unlikely to be heard. The canister filter will have two tubes coming from the top, both of which can rotate 360°. The tubes are ribbed, making them kink resistant and super easy to set up.
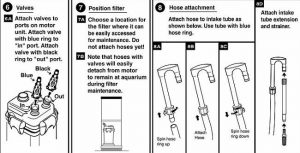
The outlets are blue, the intank, and white, the output. Screw the outlets into place. The tubes connect to these with a bit of force and twisting. The outlets have a flow control valve on them, which allow you to close off the water flow and remove the filter for maintanence.
The tubing will need to be measured and cut, which is done simply by placing the intake and output into the tank and cutting a bit more tubing than needed off of the main length of tubing. If you would like to use your own tubing it is 5/8″ inch.
The intake provided is a standard tube strainer where as you have multiple options for the output, a directional output or spray bar. As mine is in the bedroom I opted for the submerged directional output.
Once the tubes are in place you will need to prime the pump. This is done by pushing in the large buttom located on the top of the filter. Do this a couple times quickly and water will rush into the filter. Once it is full you may plug in the canister filter. During this time a lot of air will be coming out of the output, which is normal as the tubes and filter are full of air.
Cleaning
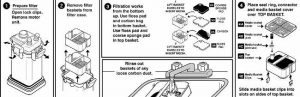
To clean this filter simply unplug it and close the intake and output valves by twisting the valves on top of the filter. Once this is done you can remove the outlets, not just the tubes, and they will hold the water there. Use the canister filters built in handle to carry the filter to a safe spot for cleaning. Put the filter down gently, as the footing is not meant to take abuse.
Undo the clamps on the side of the filter and lift out the filter media baskets. The top tray is held in place by a gasket, which you will need to remove. Do not lose the gasket. You may then change or rinse off your filter media and rinse out the body of the canister filter. Depending on the size of the Penn Plax canister filter you have you may have more or less baskets. If yo uhave excesse baskets feel free to fill them with bio-media, but avoid finer ones like crushed coral. Those can get loose and either damage the impeller or just make a bunch of noise.
With everything cleaned you can put the pump back together in reverse order and carry it back to the tank. Reattach the outlets as tight as you can before opening their valves. Once they are opened you may plug the filter back in.
Warranty & Lifetime
Penn Plax suprises everyone by providing a strong three year warranty on this budget canister filter. Simply call or email Penn Plax and they will help you troubleshoot or repair your canister filter. I reccomend calling, as emails often take a day or two.
The impeller is the only component in the canister filter that can break, making the lifetime subject to that part alone. If you keep the canister filter clean, say a cleaning every 6 months, you should expect no less than 3 years of life from this filter. The replacement impeller is fairly cheap if it does break and Penn Plax is quick to swap out any bad motors.
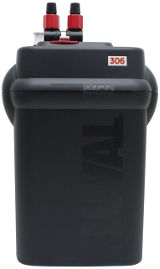
Fluval 06 Series Canister Filter

| Tank Size | Filtration Stages |
Noise Level | Longevity | Price |
| 25 – 100 Gallons | 4 | Very Low | 5+ Years | Medium |
The Fluval 06 series canister filter is the second best canister filter out there, as it rings about the same filtration as Eheim but for a higher price. The trade if is this model is significantly easier to use, is built a bit more durable and is much smaller than the Eheim.
Dimensions
- Fluval 106 : 25 gal
- 2″L x 2.8″W x 7.5″H
- Fluval 206 : 45 gal
- 4″L x 3″W x 6″H
- Fluval 306 : 70 gal
- 3.5″L x 3″W x 8″H
- Fluval 406 : 100 gal
- 4″L x 3.5″W x 8″H
Set-up
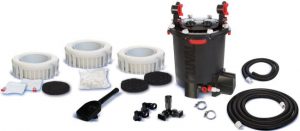
Fluval sends the 06 series with everything you need to get it up and running. Start by opening up the filter, which is done by undoing the two side latches. This exposes the motor, which is located in the cover, as well as the filter media. By removing the motors cover you will find some protective foam, which should be removed. Reapply the red cover and then remove the filter media baskets.
The filter media baskets should contain in order from top to bottom:
- A fine black mechanical filter media
- Bio media to house beneficial bacteria
- Two baskets of chemical filtration. Do not remove these from their bags
Rinse off the bio-media and put the filter back together. Next find the quick release valve, which will be two valves attached to one another via a red body with a white lever. Slide this onto the input/output of the filter and push down the red lever. You are now ready to attach the tubing.
The tube comes in one piece and will need to be cut to size. Measure the tubing so that only a few inches of slack will be left on the tubing between your tank and the filter. Be sure to use the provided tubing attachments when measuring.
The tubing comes with two C shaped clamps that will curve the tubing and hold it in place in the tank with the aid of the provided suction cups. This gives the filter a professional look rather than just hanging tubes. Fit the tubing around these clamps and use the extra small c shape clamps to clip the tubes to the clamp.
With the tubing in place you are ready to prime. This is done by using the small white pump on the top of the filter. Once you hear water rushing into the filter you will see a lot of air coming out of the input. This is normal. Simply wait until the air bubbles stop you may switch the canister filter on.
Cleaning
To start unplug the filter and close the quick release valve by lifting the white lever. You can then remove the quick release valve, but it will drop about a tablespoon of water.
With the tubing removed you can take the canister filter somewhere to be cleaned. Remove the top of the filter by undoing the two side clamps and then remove the filter media baskets.
Open up the motor again and clean off the impeller gently. You may rinse or replace the filter media at your own discretion. Remember to only use tank water to clean the filter media, as tap water will kill any beneficial bacteria.
Dump out the rest of the canister filters water and give it a quick rinse and wipe down. Don’t forget to remove the large white filter media located on the side of the filter baskets.
When putting the filter media baskets back into the filter you will want it to be in this order (top to bottom):
- chemical filtration
- Bio-media
- mechanical filter media
This will keep the bio-media from catching large debris and keep them away from the direct chemical filtration.
With everything back in place clip the latches back onto the filter and put it back in its home. Be sure to wipe the bottom of the filter before leaving it in the cabinet. Reattach the quick release valve and open it back up. The filter should start priming on its own, but if it does not simply use the pump on the top of the filter again.
Warranty & Lifetime
There is a three year warranty on the Fluval 06 canister filter with excellent customer service provided by Fluval. When contacting them they seem to call themselves Hagen, their parents companies name.
Typical use will see this filter lasting sometime over four years, however the o-ring is somewhat prone to wear. This will usually be noticed by a low hum coming from the filter, much louder than it was when you got it. Try to get this replaced sooner rather than later, as it can cause leaks over time.
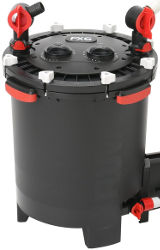
Fluval Fx Series Canister Filter
| Tank Size | Filtration Stages |
Noise Level | Longevity | Price |
| 100 – 400 Gallons | 4 | Very Low | 5+ Years | High |
The Fluval FX Series is made for large tanks that most canister filters simply cannot handle. It offers amazing filtration strength, reminder for water changes and filter cleanings, instant aqua stop valves, a purge valve at the bottom of the filter, a super quick clean up (a few minutes max) and plenty more.
Owners of this filter will typically have large fish, such as triggers, puffers, eels, multiple tangs and large gold fish. Because the filter is meant to deal with these messy fish Fluval has upgraded the design multiple times, making the impeller more resistant and even quieter than when the canister filter was first released.
Specs
- Fluval FX4
- Suitable for 100-250 gal tanks
- Max Head Height: 6.9′
- 15.6″L x 15.6″W x 17.7″H
- Wattage: 30W
- Pump Output: 700 gph
- Filter Circulation 450 gph
- Fluval FX6
- Suitable for 250-400 gal tanks
- 16″L x 16″W x 21″H
- Max Head Height: 10.8′
- Wattage: 43W
- Pump Output: 925 gph
- Filter Circulation: 563 gph
Set-up
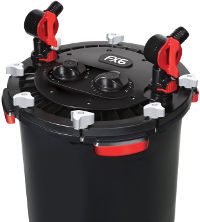
The filters large body allows for one of the easiest to work with canister filter designs I have ever seen. To start undo the eight knobs on the top of the canister filter and remove the lid. Next remove the filter media baskets by using the small red t handles located on the side of the baskets. This will remove all of the baskets at once.
Remove each basket and rinse/open each media before replacing them back in the baskets. They should be in this order:
- A fine black mechanical filter media on the top
- Bio media to house beneficial bacteria in the middle
- A Chemical filtration basket on the bottom
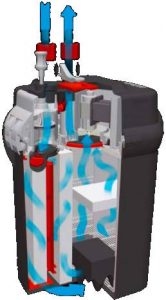
The water will pass through the filter from top to bottom, allowing the mechanical filtration to keep the biological media unclogged. The bio-media will clean the water before passing it on to the chemical filtration. The keeps the bio-media away from the chemicals while also not filtering out any of the chemicals before it can treat your tank.
Check the purge valve located at the bottom of the tank. This should be perpendicular to the tube to be closed.the end should have a white plug held in place by a red lock nut.
With this done you can fill the canister filter with tank water. Use 1.6 gallons for the FX4 and 2 gallons for the FX6, then place the cover back on the top of the canister filter. Screw the knobs back into place and find the tubing and aqua stop valves. These will be the turnable valves that will be on top of the canister filter.
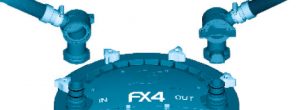
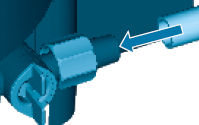
Connect the aqua stop valves to the top of the filter with small pushes and twists until they are secure. They will form a water tight seal on their own.
Next you will want to connect the end of the tube to one of the U shaped rim connector. Secure the tube in place using the smaller C shaped clips. These should snap into place, holding the tubing and forming a professional looking fixture for the tubes. Place the end of the tube in the tank and hold the other section of tubing to your filter. Cut the tubing so that there is a few inches of slack. Repeat this for the second tube.
The rim connectors will attach to the tank using the provided suction cups as well as their own clamping force. You can remove the tubing and attach the intake strainer and whichever method of output you like.
Place the tubes in the tank and connect the output first and then the intake tube. Screw them into place and make sure they are secure before plugging in the canister filter. The filter should begin running normally.
Note:
Every time the pump starts it will run for one minute, pause for two minutes to remove trapped air and then run constantly. This will occur every 12 hours.

Located on the top of the filter are two handy timers to help you keep track of when you last did a water change as well as when you last cleaned out the canister filter.
Cleaning
Cleaning the Fluval FX series canister filter is a quick process that you will only need to do a few times each year. Start by unplugging the canister filter and shutting the aqua stop valves. This is done by turning the red valves. With this done you can remove the tubes and aqua stop valves and carry off the canister filter.
If the canister filter is in a difficult to reach spot you may want to drain the water from the canister, making it much lighter. To do this attach a tube to the purge valve and drain out the water. To do this you will need to un-tighten the red lock nut and remove the white plug. Next you will need to attach the tube and put the end of the tube in a bucket or something to catch the water that will flow out of the filter. This is gravity operated so the water will only flow until the water levels are equalized. Close the purge valve when you are done.
Undo the eight white knobs on the top of the filter and remove the top of the filter. Next remove the baskets using the red T handles on the sides of the basket. Rinse or replace your filter media, but do not rinse the bio-media.
Rinse off the canister filters body and dump out all the excess water. Flip the canister filter upside down and unscrew the motor. Clean out the impeller and reattach the motor once it is cleaned. Remember to use non abrasive tools on the motor, as even minor scratches can cause irregular spinning, shortening the lifetime of the impeller.
Reassemble the canister filter, put it back in place and fill it back up with aquarium safe water. 1.6 gallons for the FX4 and 2 gallons for the FX6. Place the cover on, ensure that the rubber o-ring between the lid and canister filter is not pinched oddly and tighten the eight white knobs again. Reconnect the tubes and open the aqua stop valve. Plug the canister filter back in to finish.
Warranty & Lifetime
Fluval has some of the best customer service I have used before and they often go a bit beyond their warranty to help out customers. Simply have your model or part number ready and call them at one of these numbers:
- US: 1-800-724-2436 between 8:30 a.m. and 4:00 p.m. Eastern standard time.
- Canada: 1-800-554-2436 between 8:30 a.m. and 4:00 p.m. Eastern standard time.
- UK: 01977 521015 between 9:00 a.m. and 5:00 p.m. Mon-Thurs and 9:00 a.m. and 4:00 p.m. on Friday.
Simply ask for customer service when prompted to do so.
There is a Three year warranty on the FX series canister filter, which covers most damages. The main exceptions are user error such as drops or water damage caused by the lack of a drip loop.
The motor is built to last on this filter and the impeller has been redesigned multiple times. Each time the impeller has become stronger, quieter and better seated to reduce stress. Most users will see more than four years before any part needs to be replaced. The parts are significantly cheaper than a new canister filter, often under $20, meaning the filter will easily outlast most tanks when well maintained. The only two components you should have to watch are the O ring and the impeller.