Building your sump correctly the first time is a difficult task. When we first got into the hobby the first two sumps failed, teaching us different lessons each time. Now our sumps are strong, well aged and still perform flawlessly years later. By passing our knowledge onto aspiring new aquarists we hope to make sumps a more common feature in the fish keeping home. Without further ado let’s get on to the DIY sump guide.
The Average layout Of A Sump

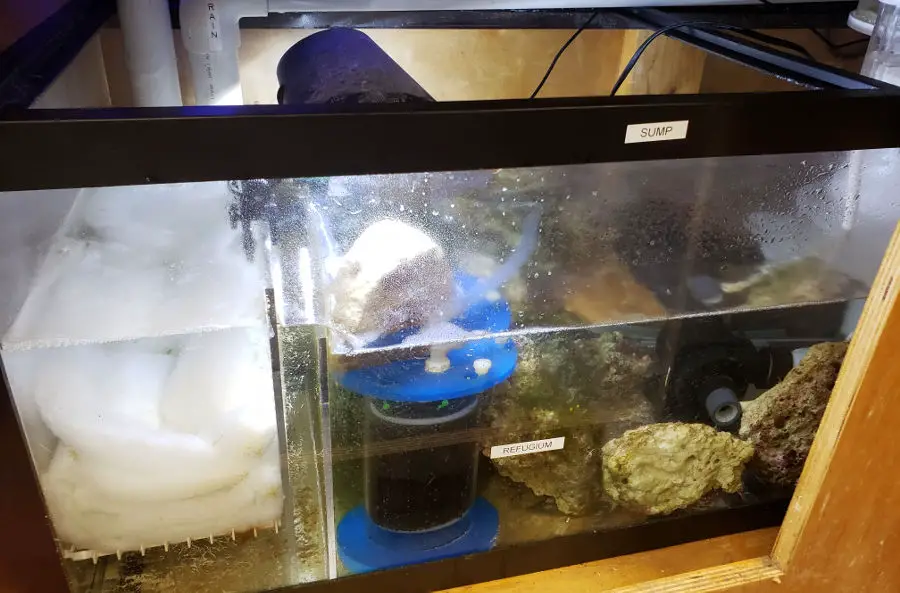
This is the general layout you will want for your sump. These exact locations have their own distinctive reasons behind them.
The Reasoning Behind Our Layout
- All Filtration Goes Before The Refugium
Why is this? As water settles into the refugium, your copepods and other microorganisms will settle onto the live rocks, macro algae and whatever else you have in that section. If the filtration was after this section you would see a pointless loss of microorganisms.
- Baffles Between Each Section
Baffles are the reason sumps are even possible. Do not skip adding baffles! They prevent flooding, equipment jamming and increase the uses of the sump.
-
-
Baffles are a safeguard to flooding. The two pieces of equipment that can break and cause you endless problems are the overflow box and the return pump. In a perfect world equipment will never break. However we prepare for the real world where our pumps wait ten years and then break while we are away from home. By adding the baffles we keep a minimum water level in each compartment, preventing overflowing the display tank.
This happens as the water level, as shown in our diagram, will be held back in each section, only flowing to the next as more water is supplied. Should the supply stop, so does the water flow and only the return pump section can be drained. With only risking two extra gallons to the display tank, we only need to lower our water level an inch in smaller tanks, and just a few centimeters in large tanks.
Now we move to how baffles prevent flooding the sump. As water is drained from the display tank into the sump, it passes through and eventually hits the return pump. Should this pump break, water will continuously build up into the sump until no more is left to drain. As seen above we leave a fair amount of space in the sump to hold this excess water. This is where we ask “how do we prevent flooding a 20 gallon sump with an 80 gallon tank?”
This is what brings proper overflow box placement into play. An overflow box will have a set of teeth to allow water in and keep fish out.
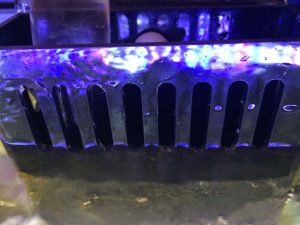
From this box water is siphoned from the display tank down into to the sump. As water is drained the level of water in your display tank goes down, but is matched by your return pump. When the return pump breaks, your water will lower until the water falls underneath the teeth of the over flow box.
Because this is a DIY guide we will assume you are using or making your own overflow box, meaning it is a hang on back version. These have the added benefit of being easily adjustable as opposed to drilled tanks. Save this part for after your silicone has dried and everything is in place. Once we are safe to start up our pump we will run a short and simple test.
Begin this test by starting your overflow boxes siphon. Ensure your return pump is off but ready to start as the water begins to drain into your sump. Keep your overflow box fairly high in your tank so not much water will be drained down. Once the water does stop flowing you can lower the portion that is in the display tank further to allow more water inside your sump. Keep moving the box down, past where you want your sump to be, until the water is about two inches from the top of your sumps rim. This will be the maximum amount of water that can be drained from your tank before the overflow box stops drawing more water.
Congratulations, you will now never suffer through a flooded tank!
-
The second function of baffles is their use in preventing plants, rocks and copepods from blowing into the return pump. Plants can get caught in the motor, quickly disabling your pump. Rocks will take up space, often reducing the water available to the pump and increasing the noise output. Copepods will naturally swim over the baffles at a slower rate. They do not re-breed in seconds, making limiting their movement to the display tank vital in keeping the population alive.
-
The final use of baffles is a three parter. They allow a wet/dry filter to be installed. These filters are so highly customizable and easily cleaned that they see use in large aquariums world wide. High fall of the first compartment to the refugium adds aeration to the tank without the use of machinery. If you own a tank you have probably grown tired of the mess of wires all our equipment creates and would be glad to remove both the filter and aeration this way. The third and final use is the reasoning for three baffles per division. While you can use only one baffle, adding two or three creates a bubble trap. Exactly how it sounds, these traps prevent bubbles from going into your return pump and creating a misty spray of water. Our very first sump had this problem and it was horrifying. These bubbles give the returning water a misty micro bubble appearance that looks far from natural. By adding these bubble traps you can avoid the constant sandstorm appearance caused by the bubbles.
- The wet/dry filter allows you to easily add chemical filter media without opening a filter.
-
This will reduce our work needed to maintain the tank, as we can just swap out or clean the filter bags in seconds. No more expensive custom cartridges required.
Refugiums are your fish free breeding grounds.
The refugium can be a god send if you own any copepod hunting fish such as dragonets. Consistently buying copepods to add to your tank is an expensive process. Our home refugiums have kept our dragonets alive for years, even getting some to be a bit fat due to the constant supply of copepods.
To encourage breeding of these important microorganisms we add our heater to this section, positioning it sideways and allowing plants to come into contact with it. Our pods exploded when we moved our heater from the first compartment into the refugium, and years later it has no slowed down a bit. They love heat and it’s just that simple.
Further more we can increase both biological filtration and add more breeding grounds for our copepod population by adding rocks, macro algae and “copepod condos.”
-
Rocks can be normal or live rocks. Live rocks have the added benefit of holding “hitch hikers” that will slowly hatch and join your tank. This ranges from copepods, shrimp and snails all the way to rare octopus. While the most glamorous hitch hiker we have gotten is the feather duster worm, it’s always a nice surprise to see someone new join your tank.
-
Macro algae are marine plants. If you are using a freshwater aquarium simply replace macro algae with plants. Plants in our aquariums can have such powerful effects despite being so simple. As they grow they feed on the nitrates in our aquarium, the end result of the nitrate cycle. These cut back on our need for water changes, making it take so long some reefers simply only top off evaporated water and forget water changes entirely. As they grow you can simply trim the plants and remove the cut portions, which is the same as removing the embodiment of nitrates. The plants grow again and keep eating nitrates in a never ending cycle.
For saltwater tanks the addition of these plants are simple. Most will happily grow without anything to cling to, which makes trimming the underwater hedges even easier. The best macro algae you can use is chaeto, a squiggly plant that grows extremely dense and at an almost weed like speed. These two traits are exactly what you want for your tank, as the chaeto will strip away toxins quickly, fit in any size refugium and create a dense housing that microorganisms love to breed in. The dark insides are the perfect hiding spot for these critters, making chaeto a super simple cover all for this section. You can usually find chaeto at any local fish store or ordering online from LiveAquaria.com Most local fish stores will part with cheato for a much lower price, and without any shipping charges. Online ordering live goods can be expensive so be sure to look around your area or even make the extra 30 minute drive to pick some up.
- The return pump section is kept small to prevent flooding
As there is only a small area needed to house the return pump and protein skimmer, we minimize this area. This allows you to keep your display tank filled higher and maximize your refugium space. The water returns to the display tank with copepods, less toxins, and reduced debris thanks to your increased filtration.
Use The Right Materials
To build a sump you will first begin by creating baffles. These take a while to set in which is why you should get this done quick and early.
First off ensure you use a strong, fish safe silicone. What is fish safe silicone? Long ago before sumps became known, General Electric sold their silicone 1 without any for of mold protection or additives. This is exactly what you need to make sure no toxic chemicals leech into your tank. However GE has since created a “fish safe” version at a much higher cost per ounce, while simultaneously removing our other choice by only producing silicones with additives. Unfortunately this means if you walk into your local hardware store, it is unlikely you will be able to buy anything other than overpriced silicone.
So where does this leave us? Personally we use this food grade silicone sold on Amazon.com. It’s cheap, leaks absolutely nothing into our water and holds firm under pressure, letting us get straight to work with the rest of our set up. The silicone requires a caulk gun. If you do not have one don’t worry, nearly every household does so just ask your friends and family. They will likely be interested in what you’re doing and gladly lend you their caulking gun and wish you luck.
Next up are the baffles. Binding our glass aquarium to anything other than glass is surprisingly difficult. While we have some degree of success with plastic baffles, they can come loose after months of use.
Silicone forms a strong bond when you pair glass with more glass. buying glass baffles is actually easier than plastic ones as many big hardware stores will offer in store glass cutting. One trip to Lowes and we had everything we needed, letting us set up our sump in under an hour.
When buying glass baffles be sure to ask that your glass worker grinds down the edges. Freshly cut glass is far too sharp to safely work with.
Baffle width should be 1/16″ less than the interior width. This will allow you to position the baffle correctly and evenly. With exact matching sizes you will have a difficult time turning and placing the baffles straight. The tiny gaps left by the baffle will be covered with your silicone, so don’t worry if the sides are not holding themselves up.
Lastly if you will be adding the wet/dry filter(which we highly recommend) you will need to buy some egg crate light diffuser. While normally used in lighting fixtures, the material is cheap and provides the perfect base to allow water through and hold our filter media. You can also find this in most home improvement stores in the lighting/electrical sections.
Constructing Your Sump
With every element explained we can now begin building the sump.
For the first part you need to be in a well ventilated area. Silicone releases acetic acid as it cures. This process takes 24 hours in an ideal location but for our fishes safety we like to let the silicone sit for a week. As the tank sits it will continue to release acetic acid into the air. Be sure you counter this by starting the build process and leaving the tank in a well ventilated area until curing is finished. A direct contact fan in an open garage is sufficient, but beware as humid areas such as outside can result in longer cure times. The cure is complete when the silicone no longer smells.
To start building, place your baffles no more than half an inch apart. closer is better so long as you do not make them restrict water flow. If you are using bendable materials such as plastic be sure to leave extra space. The water pressure will result in a bend that can block off water flow if they are too close. Try to leave only a few inches more than is needed to fit your equipment in the first and last chamber. You want as big a refugium as possible. Lastly your baffles should have at least one inch of space between the top of the baffle and rim of the sump. Should anything come loose and plug up the bottom of your baffles water can flow over the top and prevent a nasty flood. The same goes for the hanging baffle: leave one inch of space for the water to pass under. Mark the desired locations with tape on the outside of your sump.
Now is the time you’re going to want that fan on and directed towards the sump. Cut open your silicone at a right angle. This allows for easy access to the corners created by the sump and baffles. A straight cut will give you a surprising amount of trouble. Angle those scissors a bit and save your self the hassle. Load the silicone tube into your caulking gun and position yourself over the tank. Place your first baffle into position. Remember: your baffles will be close to one another. Applying silicone completely to both sides is impossible after the first baffle. Counter this by using a generous amount, getting the few inches you can of the hidden side and making sure there are no spaces or bubbles in the silicone.
Apply the silicone slowly and evenly. Do not press into the baffle as you do this. Pushing the baffle out of place with your tube will just make you have to start over again so be gentle.
When applying silicone to the top baffles hold onto them lightly while applying or get assistance if possible. Continue to hold the baffle in place for a minute after you have finished to give the silicone time to get a grip and prevent the baffle from falling.
Repeat this process until all baffles are in place. Look your work over a second time checking for cracks, bubble, moved baffles and thin applications of silicone. Your work doesn’t need to look neat and professional but you do need there to be enough silicone to hold your baffles up to the pressure. Large amounts of silicone will take longer to cure and is definitely worth the time. the extra pass on a weak spot can be what keeps your sump running 5 years longer, so don’t get lazy here.
Once you are sure of your work you will want to add on your egg crate. Place between the first and second baffle in the sump near the top with enough space to place in taller foam block if desired but high enough that you can still easily access it. Apply silicone around each leg of connecting egg crate that you can reach. This will give your surface more than enough strength to hold the flow of water onto it over the years.
With everything in place move your sump into it’s resting place where it will sit for the curing process. again this is often done in 24 hours with good air flow but we urge those unfamiliar with silicone to wait a week or so to be extra safe. Using silicone that has not finished curing is almost guaranteed to kill your fish so we cannot stress enough do not rush the curing process.
Extra precautions
With everything set and drying you should look at a few more things before calling it a day. First check out your overflow box and tubing. If your tubing does not fit perfectly or have the overflow outlet squeeze into it there are a few things you can do:
-
Buy a size converter so that the tubing fits. This can work with some overflow boxes but many expect the tubing to fit by default. With the materials we already own however we suggest:
-
Put the tube in place and use the silicone to create a strong waterproof seal between tube and overflow box. You’re using silicone anyway so you may as well let this cure too. Many tubes will “almost fit.” Many tubes will also “only slightly leak.” No one wants a leaky tank so just use a bit of your leftover silicone and plug this up. To do so run the silicone over and around the connection point on the outside only. Be generous again as this will be moving water 24/7 and any leak will have to be repaired. Ensure your tubing will be long enough or simply use the whole tube and cut it later. Place the freshly silicone sealed overflow box and tube with your sump and allow both to cure. Once finished check if your tubing is water proof. If not add another layer and wait again.
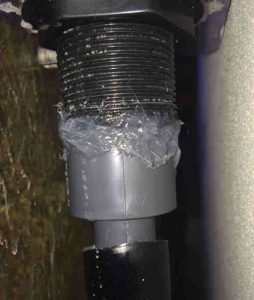
A little rough but no leaks for years
Starting Your Sump For The First Time
For this process we will say this only once. Have someone with you. If you followed our guide and didn’t slack on the work you will have no problems. However having a second set of eyes will help you spot any problem and if anything should go wrong they can quickly help you.
Put your sump into place, often directly below the display tank, and place the overflow box in the tank. If the overflow box is a hang on back version with two separate boxes you will place the one with teeth into the tank. Place the tube from the overflow into the position it will be sitting in for it’s lifetime and ensure the tube and outlet of the tube will not move easily. The force created by the siphoned water will be stronger than most think so have the second person watching when you start the siphon.
Before your siphon is started set up your return pump and it’s tubing into the display tank. If you are going to have the tube touch the water, which is often done to prevent the water hitting the surface, then be sure you make a hole in the top of the tube just below the water line. This hole will save your floors. Should the return pump fail while its tube is in your display tank a reverse siphon will begin. This pulls water from the display tank to your sump until the water is under the tube, typically pulling far more water than the sump can hold. Providing the hole in the tube above your water level allows for air to enter the siphon and ends the process before too much water is drained. Maintain this hole as it can become blocked via salt creep or algae.
With both set in place you can begin your siphon. Triple check to be sure there is no smell from your silicone and that it is fully cured. Make sure your overflow box has water in the outside portion as well as the inside. My fiance once tried to restart the siphon for half an hour without knowing this(she tried though!) and no matter how hard you try it will not start. Begin the siphon and watch your tubing on both the inside of the sump and the bottom of the overflow box. Water will begin to fill your sump and pour over each baffle. This will instantly show you if any portion of the baffles are not waterproof. Once the water reaches your return pump section and goes above your pump you may switch it on. Your water level will now stabilize as your return pump and overflow box move the same water back and fourth. The return pump can only return what it gets and the overflow will only drain up to your recorded sump maximum capacity.
Your sump is now complete and working. Continue to watch for a few minutes and begin placing any macro algae, live rocks, copepods or various equipment into the sump. Don’t forget to move your heater from the display tank to the sump. place your filter media bags onto the egg crate and take a step back to admire your work. With a fully plumbed sump running into your display tank you now have the easiest to maintain tank possible.
Add in the extra water volume you now have thanks to your sump and clean up any tools or towels you used. Take a picture to remember the occasion and celebrate the event. I hope you’ve enjoyed my DIY sump guide.
This is my first visit to your site. Thank the Google news feed. I am. Great information. Found me just after a reseal of my 40 gallon soon to be sump. Just about to pick up the stand and start sanding it. I can’t thank you enough for the article. Thanks for including fresh water tips! Are you a shop? I don’t see anywhere to buy anything. I’d consider the patreon type thing, but cash flow dictates I need to receive for contributions. Should I just randomly click on ads?
Hey Keith,
I’m glad you enjoyed the info. I do not run a shop and I wouldn’t click on ads that don’t interest you. Distributing information and helping the aquatic community is good enough for me, as this site is much more of a hobby than work.