
View On Amazon
| Tank Size | Filtration Stages |
Noise Level | Longevity | Price |
| 25 – 100 Gallons | 4 | Very Low | 5+ Years | Medium |
The Fluval Canister filter is a top contender for the best aquarium canister filter out there. It runs dead silent, brings powerful filtration and has the longest consistent lifetime of any canister filter I have come across. The only issues I have found is that some will damage their O-rings, creating a small hum rather than the silent operation. This part can be replaced however, making it a small issue for an otherwise perfect canister filter.
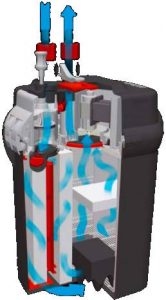
The impellers housing is built with a highly effective sound dampening case. This is what makes the 06 series so silent.
Dimensions
- Fluval 106 : 25 gal
- 2″L x 2.8″W x 7.5″H
- Fluval 206 : 45 gal
- 4″L x 3″W x 6″H
- Fluval 306 : 70 gal
- 3.5″L x 3″W x 8″H
- Fluval 406 : 100 gal
- 4″L x 3.5″W x 8″H
Set-up
The Fluval 06 series canister filter is fairly easy to set up. It comes with every piece you need to get the filter started, including the tubing.
You will want to start by opening up the filter, which is done by lifting the two side latches. This will expose the motor, which is located in the cover of the canister filter, as well as all of the filter media, located in the body of the filter. The motor will have a red cover, which must be removed before operation. Under this cover there should be a piece of foam you need to remove before reapplying the red cover. Be sure this snaps back into place.
Next you can check the filter medias in each basket. My filter came with four baskets, each filler with their own form of media, as well as a large foam pad on the side of the baskets. The baskets contain, in order from top to bottom as that is the process in which water will be passing through them, is:
- A fine black mechanical filter media
- Bio media to house beneficial bacteria
- Two baskets of chemical filtration. Do not remove these from their bags
Each component inside the filter slides out fairly easily, allowing for quick cleaning and replacement when needed. Once you are done checking the media you may place the top back on the filter and clip on the side latches.
Find the Quick release valve, which will be two valves attached to one another via a red body with a white lever. Slide this into the input/output of the filer and push down the red lever. Once that snaps into place you’re ready to attach the tubing.
The tube provided comes in one piece and needs to be cut to fit your aquarium. You will need to measure how long tube should be with only a few inches of slack available. To do this attach the input and output component onto the tubing’s end and place them in the tank. Now place the tube near your filter and cut the tube a bit below where they reach canister filter. Do this for both the input and output.
The tubing attachments, intake and output, come with 2 suction cups each. One suction cup will be held in place using a clamp like device, which snaps into place on the tubing.
With the tubing in place you are ready to prime, which is pretty quick and easy. Use the small white pump on the top of the filter to prime the canister filter. This will take several pumps. Once you hear water rushing into the filter and air coming out of the output you will have to wait a bit. Once these two stop the canister filter will be filled with water and can then be switched on.
Cleaning
Remember the quick release valve? By simply shutting off the filter and then lifting the white valve up you can remove the quick release valve. This will still have tiny bit of water in it, so be prepared to catch it or have a towel around the valve. It should be no more than an oz or two of water.
With the tubing off of the filter you can then carry it off to the tub or place it on a couple towels. Next you will need to remove the top of the filter by undoing the white latches and lifting it off. The canister filter will still be full of water so do not expect this to go perfectly.
You can now remove the baskets and place them into either the tub or a bucket full of tank water. I tend to only place the biomedia into the bucket of tank water, as it has a lot of beneficial bacteria that can die if left exposed to air too long. Likewise tap water will kill this bacteria, so only use tank water. The filter and chemical media baskets can either be rinsed or replaced depending on how used it is. Typically I will rinse them once or twice before replacing them, but this is entirely up to you. You will also want to remove the large white filter pad on the side of the filter. Mine has four sponges, two per side. These will mostly catch large debris making it the easiest to rinse off and reuse.
You should also clean off the impellers housing, which is the top of the filter. Wipe down any surface you see while also removing the red cover. This will expose the impeller. Remove this carefully and wipe it off using cotton swabs. Do not use any abrasive towels or paper towels, as even the smallest scratch on this part can cause irregular spinning and drastically shorten the canister filters lifetime.
When putting the filter back together you will want to have the filter pad basket at the bottom, followed by any biological filtration and finish with the chemical filtration. Remember to slide the large red and white filter pad back into the side before replacing the top of the filter. Clip the latches back into place and re attach the tubes. Once those are back in place you may lower the red lever on the quick release valve followed by the white release valve. This will reconnect your filter system to your tank.
With this all in place you will want to prime your filter again using the white plunger on the top of the filter. The filter should not take that long to fill up with water, as it is mostly full already. Plug the filter back in and you should be good to go.
Warranty & Lifetime
Fluval provides a three year warranty on this canister filter, making it one of the easiest to care for. Fluval provides excellent customer service, so do not hesitate if you are having issues with your filter. Don’t be worried if they refer to themselves as Hagen, as this is their parent brand name.
On average users will see over four years of lifetime from the Fluval 06 series canister filter, however some parts may deteriorate along the way. The most common part that does this is the O-ring. when this happens you can expect the canister filter to change from a silent machine to a low hum. While not too big an issue it can be noticed in quieter rooms. Replace this O-ring if it becomes an issue.