Creating an Underwater Garden
Planted aquariums hold many benefits beyond that of bare tanks. Naturally formed lakes, rivers and ponds are all house plants which in term keep the water cleaner through biological filtration. The plants are supplied nutrients by the waters inhabitants in the form of carbon dioxide and waste.
Bringing all the uses of plants to your tank is a beautiful way to add efficiency to your aquarium. Both new and experience hobbyists will enjoy the filtration benefits plants provide without more equipment. In this ride along guide we will be setting up a simple 10 gallon planted tank, showing the growth over a few months.
What You Will Need
- Powered Filter
- Submersible Heater
- Thermometer
- Substrate
- Glass Canopy or Hood
- Aquarium lighting
- Method of aeration
- About an hour of time
Choosing The Right Plants
When choosing your plant you need to ask a few questions:
- How strong are my lights?
- What height do I want the plants to reach?
- How dense should my plants be?
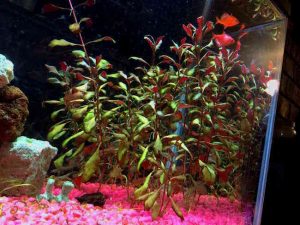
Various plants need different light strengths to survive. In this guide we will be using two plants. scarlet temple, a tall plant that combines green and pink colors for a diverse look. Our second plant will be a common sagittaria.
The sagittaria will require very moderate lighting, and because it sits at the bottom of the tank we will not be able to pass it off with the bare minimum. Scarlet temple however makes an amazing pair with sagittaria as it requires very low lighting and can turn colors to prevent receiving too much light. In other words we will get a lovely pink and green plant that grows tall in the background along with our green floor spreading plant.
When choosing your own plants remember to position them according to their height. The taller the plant the further back in the tank it should be. No one wants a curtain of plants blocking all sight of their aquariums but they do provide a nice background. Likewise short plants cover the floor providing our substrate with contrast when placed in the front.
Be sure to match your plants lighting requirements with one another and adjust according to depth in tank. As the light travels through water it loses some of its strength, making lower light requirement plants more suited to the bottom of deep tanks. This can be circumvented using powerful lights, but be mindful of your tall plants as well. These plants, especially in deep tanks, will be receiving much stronger light than those at the very bottom of the tank. Plan your lighting according to full growth height. While your plant may not get perfect lighting its first week it will quickly grow taller to reach more light. If you had the plant already under it’s full light needs then the light will turn out to be too powerful once the plant fully grows. This can cause unsightly burns to your plant and cause it to die off.
Learn about ten great aquarium plants that require only low-lighting here.
Our Underwater Soil
Just as with garden plants and crops, aquarium plants have complex roots that require a substrate to dig into. While we have grown many plants using standard gravel, more specialized substrates will give your plants a boost of vitality. Because this is a 10 gallon tank we will be using common gravel from Petco to demonstrate how easy planting can be.
Ensure you love your substrate color. Once the plants have taken root switching to new substrate will become a much bigger task. For an all green floor we like brighter substrate and will be going with pink to show a strong contrast. Going the completely opposite way with black substrate can make your green plants stand out as well. The plants won’t notice the difference so this is all just personal preference.
For more information on the best substrate for planted tanks view our section in the substrate page.
Setting Up Your Planted Tank
Before adding any water or substrate you will want to rinse your substrate thoroughly. This makes your substrate heavy and prevents sandstorms caused by unprepared substrate. When rinsing different elements will float to the top such as dust and unwanted organic materials. Slowly pour these out, as sudden movements can cause the rest of your substrate to pour out as well. With the substrate rinsed and ready to go pour it into your aquarium gently and even out the layers, or create hills if you’d like. Be sure your plants will have enough depth to spread their roots.
With your substrate now in place, take a clean, preferably unwashed or long since washed, plate and lay it down in the tank. This will give us a solid surface to hit when pouring the water without disturbing our substrate.
For the water you can use reverse osmosis for the perfect aquarium base. If you are new to the hobby or don’t want to sink the money one of these filter costs, using tap water conditioner found at any major store will do just fine. When making the water try to start with as close to the desired temperature as possible to save a bit of time. Add your water until it has almost reached the desired height.
With the tank almost full of water you can add your equipment. Place the heater in the back of the tank, preferably by your filters outlet or aeration. This will give the heater a bit of extra water movement around it, letting heat spread a bit quicker. Place your thermometer in an easy to see position. We will be placing ours along the side of the tank so it does not disrupt normal viewing but can be seen without any trouble. Let your tank sit and reach the desired temperature.
All in take equipment in place, next up are the plants. Our scarlet temple came with a paste of nutrients attached to the bottom. While beneficial to the plant, this holds them far too close for our liking. We spread the stalks of plants small distances apart, burying each plant to the bottom of the gravel. A few float to the top so we re-planted them until they stayed rooted.
Finally you can place your light fixture over your tank. The typical cover will come with a plastic attachment for the very back of the canopy. Cut this plastic part to allow your filter, aeration and heater wires to slip out easily. The smaller the cut you can make the better, as a tighter seal will prevent noise and reduce evaporation. For the light we enjoy using the Deluxe Hood from Amazon as it removes the need for a glass canopy and only needs one bulb, allowing for cheap and easy replacements. For serious growers you can find many grow lights that promote growth further, but normal lighting will be more than enough.
If you went the glass canopy route, place your light enough above the canopy that it will not heat the glass. Perform a light bump test to ensure your attachable light will not fall over and you are nearly done.
The most difficult part is here, waiting. With all new tanks you should feed your fish tank as though it had fish in it already, waiting up to three months for the tank to cycle. In short this process builds up the necessary bacteria to handle fish waste and the toxins they create. A few methods you can use to speed this process along are:
- Add pure ammonia(be sure you know what you’re doing)
- Add bacteria from a bottle, such as nite-out found in most stores for around $5
- obtain used filter media or substrate from a healthy fresh water tank. This requires knowing another aquarist, or reaching out to your local aquarium group. they are easily found on social media and will gladly help you for free.
Jobs Done
While the tank cycles you will see your plants begin to grow and take root. Test your water every 1-3 days for free at a local pet shop or with a test kit at home, checking the pH, ammonia, nitrite and nitrate levels. successful readings will be:
- pH: 6.6-7.8
- Ammonia: 0 ppm
- Nitrate: 0 ppm
- Nitrate: 20-40 ppm
After you get these readings you are safe to add fish! If you wish to skip the cycling process you will need to test you tank daily and perform very frequent water changes. This will slow the growth of bacteria which is why we recommend waiting for the cycle. far less work for a safer tank. Either way you now have plants and fish living in harmony!
Bonus: Spreading Your Plants
That plant looks nice, but wouldn’t it be better if you had just a bit more of it, or maybe a lot more? Well want no longer and instead have your extra plants for free. To easily double your plants you can prune the tops and replant what you have just removed. Ensure you cut far enough down that you can replant the new stems but not so far that the old plants die. Give the plants a few weeks and they will be growing again, showing no sign of being cut and doubling their numbers with each time you do this.