| Tunze Turbelle | Koralia Evolution | Maxspect XF | Current USA eFlux | |
 |
 |
 |
 |
|
| Flow (GPH) | 475-2100 | 600-1500 | 230-5300 | 660-2100 |
| Tank Size | 10-265 | 25-175 | 25-800 | 20-175 |
| Noise Level | Near Silent | Low | Very Low | Near Silent |
| Longevity | 4-12+ Years | 2-8 Years | 2-6 Years | 3*+ Years |
| Price | Medium-High | Medium | High | Medium-High |
| Jump to Review | Tunze | Koralia | Maxspect</a | eFlux |
Like many aquarists I put my new homes first aquarium in the bedroom. A beautiful sight to be sure, however the noise from my old powerhead caused some trouble sleeping. After some research and swapping around powerhead from previous tanks I had found several solutions to quiet my noisy powerheads.
This means each of these powerheads have been tested in my own bedroom on a 55 gallon reef tank that sits 4 feet away from the side of my bed. The powerhead is on the tanks side that is closer to my head, making the powerhead about 6 feet from my pillow.
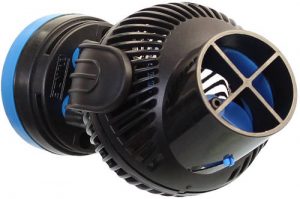
Tunze Turbelle
| Size | Dimensions | Tank Size | Noise Level | Longevity | Price |
| 475 GPH View on Amazon |
2.9″ x 2.7″ x 2.7″ | 10-55 Gallons | Near Silent | 4-15+ Years | Medium-High |
| 660 GPH View on Amazon |
2.6″ x 2.4″ x 3.2″ | 10-66 Gallons | Near Silent | 4-15+ Years | Medium-High |
| 740 GPH View on Amazon |
3″ x 2.7″ x 2.7″ | 15-75 Gallons | Near Silent | 4-15+ Years | Medium-High |
| 53-1188 GPH View on Amazon |
2.5″ x 2.5″ x 2.5″ | 5-132 Gallons | Very Low | 6-15+ Years | High |
| 400-1175 GPH View on Amazon |
3.1″ x 2.7″ x 2.7″ | 10-135 Gallons | Near Silent | 4-15+ Years | Medium-High |
| 1700 GPH View on Amazon |
4.5″ x 3.5″ x 3.5″ | 65-210 Gallons | Near Silent | 4-12+ Years | High |
| 2100 GPH View on Amazon |
4.5″ x 3.5″ x 3.5″ | 105-265 Gallons | Near Silent | 4-12+ Years | High |
Tunze has long been one of my favorite powerheads. They have a decent cost, yet their reliability is unmatched by even the most expensive powerheads out there. They can last over two decades, are easily repaired and for the importance of this page, completely silent.
While most companies have had to continually improve their powerheads, struggling to maintain durability with silent operation, the Tunze Turbelle has been running silent since its creation.
Set-up

You can set up this powerhead in a matter of minutes, provided you do not get the magnets stuck together like I did. If this happens I will provide a quick guide at the end of the page on separating them.
To start you will attach the four rubber connectors to the base of the powerhead. This serves as a connection between the powerhead and its base. This will dramatically cut down on noise produced by the powerhead, helping create the legend of Tunze’s silence. Refer to the magnetic mounting section for the next part.
The cord is a nice 2 meter cord, just over 6.5 feet, and both magnets are safe to submerge. The rotor makes a bit of noise during the first day as it gets set in place, but after that it is dead silent. Mine sits only a few feet from the head of my bed today and I still do not hear it.
Flow & Adjustments
There are two controllable versions of the Tunze Turbelle: the 6040 and 6045 which are both controlled differently. The 6045 has a blue slider located at the nose of the powerhead. The closer the slider is put to the base of the powerhead, the less flow it will produce. The 6040 comes with a controller, making it much more advanced. With the proper settings you can turn it into a wave maker.
The direction of the flow can be adjusted a full 360 degrees. The body swivels up and down in the mounting bracket. When turning the powerhead to the side it is important to turn both the interior and exterior magnets together. If you try and only turn one they will slowly rotate away from how you want them.
Assembly
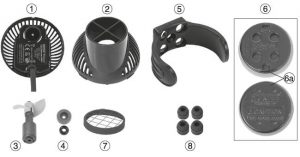
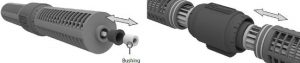
The Turbelle powerhead opens at the middle of the body, giving you direct access to the propeller. The propeller should be removed for cleaning, which will also expose the magnetic mount in the base of the powerhead (Seen in 1).
When cleaning these magnetic parts be sure to use soft, non-abrasive materials such as cotton swabs or soft cloth that has not been exposed to any chemicals. Any and all scratches will lead to improper spinning of the propeller, reducing flow and drastically shortening the lifetime of the powerhead.
The grates on the side will keep all fish away from the propeller, however butterfly fish will still be able to stick their mouths inside. If you have one of these fish you will need a fine mesh net to cover the powerhead.
The magnets are covered by a rubber protector, which cuts down on any vibrations produced by the powerhead. The only time I head the pump making noise was when the cord was vibrating against the wall. After moving it slightly to the side any noise was as good as gone.
Warranty & Lifetime
The two year warranty offered with the Tunze Turbelle is almost useless, as the powerhead will easily last five to ten times as long as the warranty. Tunze will always help their customers if your powerhead should fail, but that should never happen.
While a lifetime of 10-20 years sounds impossible, it is almost guaranteed. Travel to any aquatics store with a Tunze and they’ll tell you the same as I will. My first Tunze is still running as smooth as the day I bought it.
If you are planning to have a long standing tank, the Tunze will easily provide more value than any other powerhead. Its extreme lifetime ensures you will not need to replace it any time soon, and even when it does break Tunze will sell you a replacement part at a fraction of the cost a new powerhead would be.
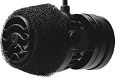
Hydor Koralia Evolution
| Size | Dimensions | Tank Size | Noise Level | Longevity | Price |
| 600 GPH | 5.5″ x 2.75″ x 2.75″ | 25-80 Gallons | Very Low | 2-8 Years | Medium |
| 850 GPH | 5.5″ x 2.75″ x 2.75″ | 30-100 Gallons | Very-Low | 2-8 Years | Medium-Low |
| 1150 GPH | 5.5″ x 2.75″ x 2.75″ | 45-140 Gallons | Very Low | 2-8 Years | Medium |
| 1500 GPH | 5.5″ x 2.75″ x 2.75″ | 55-175 Gallons | Very Low | 2-8 Years | Medium |
The Hydor Koralia gets a lot of praise in the aquarium world. It is not costly, runs well and is quiet enough for most households. While it is not as effective as the Turbelle it is still worth a recommendation, especially if you can find it on a sale. If your powerhead is in the bedroom you may notice it, however it is inaudible in the living room.
Set-up
The biggest fault of the Koralia can be fixed before installing it. Using aquarium safe adhesive, make a small layer around the interiors pin. This will help prevent it from snapping, which is the main cause of failure.
The Koralia attaches just like the Tunze, minus the four rubber mounts. The magnets have a suction cup underneath them, making their mounting a bit more secure. This does not mean the magnets are weak, so take great care in keeping them apart. When placing the powerhead against the glass be sure to press all the air out of the suction cup, as this has been known to make the powerhead louder.
The Hydor Koralia comes with a 6 foot cord, allowing for plenty of wire to make a drip loop while still positioning the powerhead wherever you like.
Note: A small problem with the Koralia is its start up process, which will often have the powerhead run in reverse. The powerhead corrects this by having the propeller spin forward, hitting a check pin. This will reset the powerhead, causing it to spin normally. This will damage the powerheads interior pin, which is why I suggest coating it with aquarium safe adhesive.
Assembly
The Koralia makes for a good quiet aquarium powerhead, but not a wave maker. If you plan on using a controller to make this function you should look at other options. Repeated checking to fix reverse running will be quite noisy.
The Hydor Koralia separates at the middle of its body, letting you remove the magnet and clean out the housing with ease. There is also a propeller protector, which keeps the propeller from striking the sides of the powerhead. Be sure to keep the in the powerhead.
The grate is fairly small and will keep all fish away from the propeller. It also features a wire protector that keeps the in tank wire from being picked at by parrotfish, triggers and sea urchins. Just like the Tunze I suggest you keep the wire away from anything or tape it down. Movement leads to noise.
Flow & Adjustments
The flow is non controllable, however it has plenty of sizes to fit any aquarium. Additionally you can diffuse the powerhead by pointing it at rocks, walls or various decorations to decrease the flow strength.
The flow given from this powerhead is fairly condensed. Think Jet engine rather than box fan.
The powerhead is mounted on a ball joint, which allows for easier directional facing on the powerhead. It does not feature the same level of noise reduction as the Tunze, due to no sound dampening rubber connections.
Warranty & Lifetime
Hydor covers their Koralia powerhead with a two year warranty. This should be more than enough time to catch any faulty units and exchange them for powerheads that will last over 5 years.
If you want to get the most out of any powerhead be sure to clean it regularly. This goes double for tanks that make use of macro algae in the main tank. Their weed like appendages can cause excess strain on the propeller when stuck in the rotor. When this happens it may not even be visible, so be sure to be regular on cleaning.
When well cared for most owners see over 3 years of lifetime with the best cases being 6-8 years.
While the Koralia does still make some sound, it is nothing that can be noticed in a living room. Still if your tank is going to be in the bedroom, I highly advise bumping up the powerhead to a Tunze.
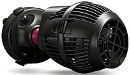
Maxspect Gyre XF
| Size | Dimensions | Tank Size | Noise Level | Longevity | Price |
| 230-2300 GPH View on Amazon |
10″ x 2.95″ x 1.57″ | 25-100 Gallons | Very Low | 2-6 Years | High |
| 500-5300 GPH View on Amazon |
11.8″ x 2.9″ x 2.4″ | 50-800 Gallons | Very Low | 2-6 Years | High |
Maxspect offers a different kind of powerhead, one that is very quiet and extremely unique. It produces a multitude of different flow patterns, which cannot be replicated with one or two normal powerheads. This has best been described as a sheet of flow instead of a jet, which is much more suitable to the shape of most aquariums.
The provided controller allows the owner to set up advanced flow patterns, all of which will be described below. The Maxspect has been far and away the best powerhead I have owned for keeping sand off the bed of the tank. Overall this powerhead belongs in tanks that are made for display, as it will impress even aquarium experts.
Set-up
The Maxspect is still relatively easy to set up. Start by attaching the mounting bracket to the base of the Maxspect, which is done by sliding the two sides in place under the powerhead.
Remember: Be sure to keep all four magnets apart from one another. Additionally ensure that the intake of the powerhead is not facing the glass of the tank directly. Doing this will decrease the flow of your tank and make the powerhead much louder.
Because there are four magnets rather than two, you will want to install the magnets separately from the powerhead. Bring them close together with the tank in between them with one magnet above the other. Touch them to the glass and slide them closer until they hold themselves in place.
Finally you can change which grates and propellers are installed on the Maxspect. These extra parts are included and will allow you much more customization in your water flow. When installing these parts you must be sure to use the same grate as propeller, mean A grate with A propeller, B grate with B propeller.
Assembly
To completely open up the Maxspect Gyre I would refer you to my more focused Maxspect Gyre review page, which holds a video demonstration. Additionally you can look to the official manual for more details.
For routine cleaning you only need to partially disassemble the Maxspect. I highly recommend keeping something nearby to hold the parts of the Maxspect as you do this. I used a tackle box. Remove the powerhead from the tank while also collecting the exterior magnets. You don’t want these to fall and get chipped on the floor. Remove the brushings on the side of the Gyre and twist the grates. You should then be able to remove the grates and clean out the powerhead. Reassemble it in reverse order.
Flow & Adjustments
The flow is a truly unique feature on the Maxspect, providing such evenly distributed flow that you would need at least 6 Tunzes to try and replicate it.
The controller allows for control beyond most peoples knowledge. Seriously this pump can be used in so many different set-ups I feel like a public aquarium wouldn’t be able to use them all at once. Again for the details you’d want to read the detailed review, but here’s a quick rundown on three main modes:
- Constant Speed Mode
A simple, constant speed ideal for day time use.
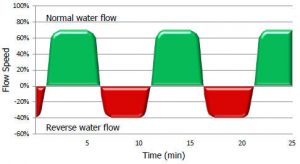
- Pulsing Mode
This mode creates consistent waves which will simulate a more natural environment. Unlike most powerhead, the large area of distribution makes these waves look and function like actual waves. Be wary of splashing water on the floor!
- Alternating Gyre Mode
This mode is the signature flow that no other powerhead can produce. IN essence it will change between forward and reverse flow, creating the most realistic marine water flow possible. Without the Maxspect you will need at least 2 powerheads to mimic this effect.
Warranty & Lifetime
The Maxspect is protected by a one year warranty and great customer service. This is more important than usual for the Maxspect.
Their excellent customer service really comes into play when parts of the Gyre begin to wear down. Finding the exact part you need to replace is made easy with their support. This makes maintaining the Maxspect easier than most components, which means owners will have no issue maintaining a silent aquarium with the Maxspect as their powerhead.
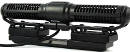
Current USA eFlux

| Flow (GPH) | Dimensions | Tank Size | Noise Level | Longevity | Price |
| 132-660 | 2.5″ x 1″ x 1″ | Up to 55 Gallons | Near Silent | 3-5 years | Medium |
| 210-1050 | 3″ x 2″ x 2″ | Up to 75 Gallons | Near Silent | 3-5 years | Medium |
| 420-2100 | 3.5″ x 3.8″ x 2.2″ | Up to 125 Gallons | Near Silent | 3-5 years | Medium-High |
Current USA’s eFlux powerhead offers an easy to control quiet aquarium powerhead. These work well both individually or with multiple powerheads. The provided controller allows for up to three pumps to be controlled at once. When combined these can simulate the Gyre flow that we discussed earlier.
This makes my list quite easily, as the eFlux also has silicone padding on the magnetic mount, reducing the vibration sounds.
Set-up
The set-up process here is a bit more complex, as the included controller has both a display and central hub. First use the provided cable wrap on the powerheads wire, covering as much of the cord that will be in the tank as possible. This will keep the cord safe from triggers and sea urchins.
Take the magnets apart carefully, making sure they never come close together. Place the lone magnet outside of the tank and the pump inside the tank. Slowly slide the two magnets together with the aquariums glass in between them, positioning the pump while installing it. The pump may be able to swivel up and down, but the magnets must be turned to change its orientation.
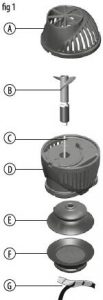
The HUB and display must be within 10 inches of one another. Attach these to your tanks stand wherever you would like. I don’t change mines settings too frequently, so mine are both on the inside of the stand. To start it is better to keep the display on the outside of the tank while you learn how to use the pump.The powerhead comes with wood mounting screws as well as mounting brackets, as seen below G/E. The HUB, D, attaches to E while the display, F, attaches to G.
The mounting bracket E has places to hold the silicone caps from the pumps DC input as well as the connection on the hub. The IR sensor must be kept outside of the stand. You can position this wherever you like, but you will want it to have a direct line between it and the controller when you change the pump.
Next you will need to:
- Connect the LED display micro USB cable into port two
- Connect the IR sensor into port one
- Connect the eFlux Wave Pump into P1 pump connection
- Connect 24 DC cable into P1 Power DC input
- Plug the 24 DC transformer into GFCI(three prong) outlet
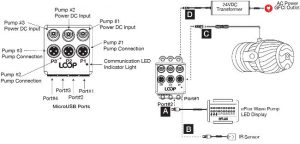
At this point the LED indicator light should turn blue. finish by tying up any excess cable wit the provided Velcro straps and remove the plastic battery tab from the remote control.
Flow & Adjustments
The controller is easy to work with and offers complete control over up to three powerheads. You can use the main on/off key to turn all powerheads on or off. By holding the individual pump keys for five seconds, you can turn them on or off one at a time.
By holding the lock button for five seconds you can stop any and all communications from the remote and IV receiver. Very important for when kids are over.
The Feed button will lower all pumps to a slow speed for 10 minutes while the tank is fed before resuming their previous settings.
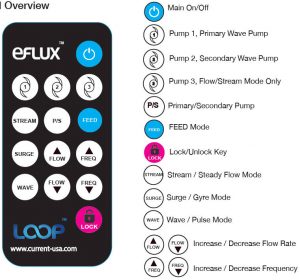
To avoid any miscommunication I will simply link the manual for the fully detailed programming guide. This will be displayed in a PDF. For those worried about opening a file from smaller sites such as mine, the manual can be found directly from Current USA’s support page. It will be the first listed option on the left under user’s manual. Keep in mind that continuous ramp ups and downs will be more noisy than a steady stream.
Warranty & Lifetime
Again a one year warranty is supplied for the eFlux powerhead and controller, with the customer service being extremely helpful. More often than not they will help you even after the warranty expires.
The pumps are generally well lived, often exceeding 5 years when well cared for. The main problem, as with all powerheads, are the propellers. So long as you keep these clean and free of any large debris the pump should last for quite awhile. That being said even if the propellers break current USA will ship you a replacement for a small fee.
Using Magnetic Mounts
Remember that these magnets are not toys! They can seriously hurt careless users and pull metal objects from a good distance away. Do not play around with them.
Lower the powerhead into the water, holding it and its mounting magnet firmly against the glass. Next bring the external magnet Just above the internal magnet on the outside of the aquarium glass. Slide the external magnet down the glass until it is aligned with the interior magnet and you’re done.
The reason you do not want to bring the magnets directly to one another with the glass between them is simple. To hold through thicker aquarium glass the magnets need a lot of force. Should they pull themselves loose from your hand the magnets can easily slam into the side of the tank. While not common this can crack your aquariums glass.