| Fluval C2/C3/C4 | Penn Plax Cascade | Marineland Penguin | Aqueon QuietFlow | |
 |
 |
 |
 |
|
| Tank Size (US Gal) |
10-70 | 10-100 | 20-70 | 10-75 |
| Filtration Stages | 5 | 4 | 3 | 4 |
| Noise Level | Low | Low | Medium | Very low |
| Longevity | 2-5 Years | 3-5 Years | 2-8 Years | 1-3 Years |
| Price | Medium-High | Very Low | Medium-Low | Low |
Finding the best aquarium power filter can bring forth amazing results without costing as much as canister filters. They surpass internal filters in strength and allow for multiple forms of filter media to be used with ease. They tend to be a bit more noisy than other filtration options as a trade off, however they are unlikely to be the most noisy piece of equipment the tank requires.
The filters have been ordered in the order that I would recommend them, however they each have their own special merits. Check out the table above for a quick run down and read their more specific reviews below.
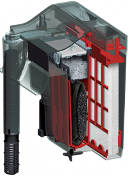
Fluval C-series Power Filter
The Fluval C power filter is the best quality hang on back filter without going out of line in terms of cost. It features five different filtration stages, including mechanical, biological and chemical filtration. It has plenty of user friendly features, such as the indication bar on the top of the filter, showing when the filter media needs to be changed.
Set-up
The Fluval C Series power filter comes completely assembles, making it almost plug and play. Simply fill the filter with tank water and switch it on.
The filter comes equipped with each filtration stage, meaning there will be no add on purchases necessary. If you would like you can attach a pre filter sponge to help extend the effective time of the mechanical filter media, however with this particular filter I don’t find that practical. The filter media can easily be removed and rinsed off before being reinserted in the tank just like a prefilter sponge would be.
Assembly & Cleaning

No filter can remove debris without becoming dirty, therefore knowing how to disassemble, clean and reassemble the filter is absolutely necessary. Luckily with the Fluval C this process is extremely easy. For the visual learners here is a great instructional video.
If you watched the video feel free to skip the rest of this section.
Start by unplugging the motor from the electrical outlet but do not remove it from the filter. The motor creates a water tight seal with the filter, holding the water in place. Move the filter to a sink or tub before taking the motor off. You can also tip the filter over and pour the water out that way.
The motor comes off by pulling down and twisting. This is not too difficult, so try not to use too much force. Once removed you can take out the motors impeller, which is held in place via magnetic force. The impeller and magnetic mount should be cleaned using soft, non abrasive materials. For impellers I always recommend cotton swabs, as they make the process fairly simple and are found in almost every home. Any scratches to these parts will result in irregular spinning, which will dramatically shorten the impellers lifetime. When you are done cleaning the impeller simply put it back into place.
The filters top lifts off, exposing all of the filter media and the inside of the filter. You can wipe this down or rinse it off, however you will only want to use unused paper towels and tank water. Tap water will kill off the beneficial bacteria that hides in the filters tickle chamber where as towels have often been cleaned with chemicals even before you purchase them.
The filter foam located in the red basket can be reused several times. The C-Nodes, which also house beneficial bacteria, should not be touched and should not be out of the tanks water for too long.
Once you are done cleaning the filter simply put all the media and components back into the filter, re attach the motor. Fill it with tank water above the sink to ensure the water proof seal has been formed. You can then carry the filter back to the tank and plug it back in.
Indicators & Adjustments

The top of this hang on back filter features a flow adjustment valve as well as the indicator switch shown above.
The indicator will slowly be pushed up as the filter collects debris. Once the indicator is fully exposed you should clean the filter. You can clean just the media if this happens fairly quickly, which it often does when upgrading from a low power filter to this one.
The flow adjustment switch has three settings. The low and medium settings will filter the water more thoroughly by performing multiple passes on the same water, where as the high setting will increase the flow and clean as much water as possible.
When first installing the filter you will want to run the filter on low. This will cause the least wear on the impeller as the filter starts up. Once the water is flowing regularly though the filter you can choose whichever setting you’d like.
Warranty & Lifetime
The great thing about choosing large brand is their customer service. Fluval will respond to any questions you may have about the filter, making troubleshooting a breeze.
Fluval provides a two year warranty for this particular hang on back filter. This begins on the day of purchase, however Fluval has been rather flexible with me personally when it comes close enough to the warranty. If anything breaks or begins to wear out call Fluval before attempting any repairs yourself. They are always happy to help.
The average lifetime on this filter is pretty good, often between four and five years. The only component that should be able to break is the impeller. Clean it carefully and keep larger debris/rocks/macro algae away from it and you should easily get to five years at least.
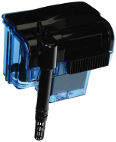
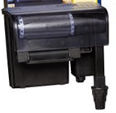
Penn Plax Cascade Hang on Back Filter

This is my second recommendation on the basis that it is powerful and cheap. It is so cheap that by simply choosing a large size you can easily have near canister filter like performance at a fraction of the cost. The only real draw back is that the filter is a bit bulky, making it difficult to place between a tank and wall.
Set-up
The filter comes fully assembled, complete with a white poly filter for mechanical filtration and activated carbon to serve as the chemical filtration. Carbon is often the best choice, as it helps keep the tank extra clear while reducing any odors produced by the tank. Keep in mind that activated carbon will filter out medication, so keep this out of the tank if you are treating the inhabitants. The filter will accept other forms of chemical filtration if needed.
The internal sponge and aerated water return form the last two stages of biological filtration. These areas are ideal for beneficial bacteria and will help cut down on harmful nitrites and ammonia, reducing them into nitrates which are far less harmful to fish and food for any underwater plants/macro algae. The only other method for removing these is water changes.
The filter will need to be filled with water before being started. This process can take a bit longer than most power filters, as the water will surge up and down the intake tube until it finally makes it over the hump. Once the water reaches the top it will begin flowing through each stage of filtration before returning to the tank. Running the filter without water will damage the impeller.
On the top of the intake valve is the flow control valve. This simply works by blocking the intake valve, and therefore does not reduce power consumption or wear on the impeller. It does however reduce the flow rate dramatically and help make the filter much quieter. I only recommend turning it down if the filter is too loud.
Assembly & Cleaning
The power filters top comes off without any snaps or latches, making it extremely easy to remove or replace the filter media.
For this filter you are free to use any form of mechanical filtration you see fit. I personally use these poly pads found on amazon. They are extremely cheap and are absolutely enormous. Once cut to size they can be placed into the filter. They can also be rinsed and reused several times before they get worn out.
If you wish to keep running activated carbon you will have to replace it every few months. How frequently you will need to do this depends on your waters contaminates, such as medication or tannin leeching woods.
As with the previous filter you will not want to touch the biological filter steps. You can rinse them with tank water if there is a lot of debris stuck on them, however you will be losing some of the bacteria by doing this.
The motor comes off by first twisting and then pulling down. This should be done either over a sink or after pouring out the water. Remember to unplug the motor before doing any of this. Once the motor has been remove you should clean off the impeller with a cotton swab. This part is the only one that can break on its own, so be sure to clean it well.
Warranty & Lifetime
Even though this is one of the cheapest power filters available it still comes with a three year warranty. It will not cover any damage cause by negligent use such as dropping the filter or trying to modify it. Still they will typically help me with no questions asked, so you should still ask for help anyways.
The impeller is the only part of the filter that can break on its own. This means when set up properly, with regular cleaning there should be little wear on the impeller. Under these conditions you can expect the filter to last over three years easily. Because the lifetime matches the warranty I highly recommend you check your filter before it reaches three years to see if it can be replaced.
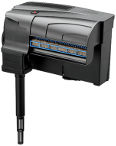
Aqueon Quietflow Power Filter

Wrapping up our best hang on back filter guide is the Aqueon Quietflow power filter. It brings decent power, an almost inaudible volume, is extremely easy to work with and remains quite reliable. This is backed by Aqueon’s Lifetime warranty, making this the safest buy if none of the other filters have sat right with you.
Set-Up
The Quietflow comes partially assembled and wrapped up tightly in a plastic wrap. The filter media is packed inside the filters body in another bag. This should be rinsed off in tank water. If run without rinsing it will give off weird smells for a day or two.
The bio-holster and diffuse supplied with the filter create great surfaces for beneficial bacteria, breaking down harmful chemicals in the aquariums water. Additionally the diffuser returns the water to the tank much quieter than the other filters. This is less important if the tank is in a large room, however those with bedroom tanks will really appreciate the feature.
The motor is self priming unlike the other models. This is possible as the intake tube is attached directly to the motor rather than the motor being placed under the opening of the intake tube. This will keep the motor running even if the power flickers on and off, making it great for those who leave their tanks every once and awhile.
The Quoin Quietflow does not come with any form of chemical filtration, however it does have a compartment for it. This is not needed if your tank has no specific issues, with running activated carbon being the most common choice.
The motor comes attached to the filter, however the intake tube will need to be attached to the motor. This takes a bit of force, as you will push the intake tube in place. For a more detailed look check out the official video on maintenance.
Assembly & Cleaning
Taking this filter apart is not too difficult and is explained in the above linked video. You will want to clean the filter every month or so to prevent any nitrate traps from forming in the filter.
Indicators & Adjustments
Located on the top of the filter is the cleaning indicator. This will typically sit inside the filter, only popping up once the filter media has trapped enough debris to increase the water pressure inside the filter.
This power filter has one big issue here. This will occur far too frequently for how expensive the replacement filters are. This is cause by the large debris being caught in the filter media. As the media does not do well when rinsed off you need to catch the large debris before it reaches the cartridge. This is easily done by using these pre-filter sponges I found on amazon. They simply slip over the intake valve, catching larger debris before it can make its way inside the filter. These sponges are easily rinsed off and reused. Dramatically cutting down on the maintenance cost of this filter.
Warranty & Lifetime
Aqueon has one of the best warranties I’ve ever seen in the aquarium industry. With a Lifetime Warranty there is no risk when purchasing this filter. It will run or be replaced free of charge. Just give them a call and they will inform you exactly how to do it.
The average lifetime on the Aqueon Quietflow power filter ranges between one and three years and is highly dependent on consistent care. The prefilter sponge mentioned earlier will cut down on impeller stress, as will cleaning. With diligent care surpassing three years should not be difficult.
Special Note
When replacing any filter you will need something to hold your tank over until the new filter arrives. For this reason I recommend you hold on to your old filter even after replacing it. This way if you need to use the warranty you are not left without a filter as they replace it.