View On Amazon
| Tank Size | Noise Level | Longevity | Price | Rating |
| up to 150 Gallons | Low | 5+ Years | Medium-low | 8/10 |
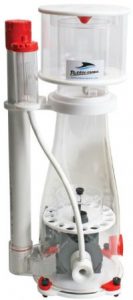
The bubble Magus Curve 5 is an absolutely amazing protein skimmer once you get it up and running. It can easily work for tanks of 150 gallons or less, fits in any tank with a base of 7.5″ or more and needs to be in at least 6″ of water. It can be difficult to set up to work optimally, which is the biggest hang up about the skimmer. If however you follow my or any youtube guide you should be able to get this skimmer up and running no problem. Just don’t be surprised when it takes a lot of adjustments to get the bubbles perfect for your specific tank. Some new skimmer even require a week or more of break in time before they produce reliable skimmate. Once the Bubble Magus Curve 5 is running properly it outperforms most other skimmers with ease.
- Features
- A pinwheel needle Venturi combo creates consistent, smaller bubbles, which in turn creates a more dense foam that is more effective at trapping skimmate.
- The more modern wine glass shape makes the skimmer more durable and take up less space/require less bubbles. This means less stress on the waterpump and a longer lifetime for the skimmer.
- Extremely easy adjustments with the water output tube on the left side of the skimmer.
- A smaller footprint that most other large skimmers, making it great for areas with little extra space.
- The rubber feet make the bubble magus silent
- Dimensions
- 7.28″W x 7.08″L x 18.5″H
Set-up
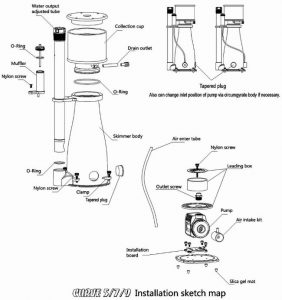
The instruction manual included is pretty limited, only having two pages. Still, this image is extremely useful.

The water pump, leading box, tubing and skimmate cup are not attached to the body in the box. They can be connected extremely quickly, but be sure to give everything a quick rinse before putting it together. We don’t want any chemicals or dust from the factory in our tank.
Once everything is out of the wrapping and rinsed we can start assembling the Curve 5. Start by loosening the four nylon screws at the base of the skimmer, which will allow you to remove the body of the skimmer. there will be a small white rubber part that comes off. This will hold the pumps power cord in place. Remove it and slide the water pump onto the installation board of the skimmer. Put the white rubber piece back on to hold the pumps cord in place.
Now you will need to put the bottom of the leading box onto the pump, followed by the outlet screw. This will hold the box directly on the pumps outlet. Put the rest of the leading box in place on top of the base and screw in the nylon screw. Put the body back on the skimmer as well as the tapered plug. Connect the muffler next to the skimmate cup and water output adjusted tube. Next connect the air intake tube to the tapered plug. This connects to the muffler. You can choose to shorten the drain outlet if you don’t plan on using it, which is what I did. Using it is more work than it’s worth. This connects to the skimmate cup, which you can now attach to the top of the skimmer. The skimmer is now ready to use.
Protein skimmers work when resting inside a body of water, one that is tall enough o cover up the internal water pumps intake. This is usually done in a sump, which is what I will assume we are doing. Any external body of water will work as long as it cycles with the main tank frequently.
Adjustments
This is where the majority of our time will be spent. Let me start out by saying you may need to adjust the water level that the protein skimmer is resting in. This usually involves moving your overflow box and changing how much water goes into your sump. For starters try putting the water at around 7″ high with the protein skimmer already submerged. As we have already set up the skimmer, turn on the power. You can then turn the water output tube to adjust how many bubble are made by the skimmer. This is the hard part. For the first few days you should simply let the skimmer run without trying too hard to get the bubbles just right. We do this because the skimmer is going to adjust a bit to our temperature and water conditions, changing how many bubbles it makes.
- How to adjust the amount of bubbles
- Turn the water output tube counter clockwise to increase the bubbles
- Turn the water output tube clockwise to decrease the bubbles
Once you are past this break in period and the bubbles are rising to a constant level you can begin to adjust the skimmers bubbles. What we aim for is just enough bubbles that they come up near the top of the cup but do not spill over. This lets them pop and toss the debris into the cup without putting an excessive amount of water into the cup. Too many bubbles and you will need to empty the cup every day. Too few bubbles and your skimmer won’t be doing anything but aerating the water.
Remember: We want the bubbles as low as possible while still working effectively. If you are not sure if the bubbles are high enough, leave it alone for a day and see if anything appears in the cup. If you make the bubbles too aggressive then you run the risk of the bubbles spilling over the top and possibly out of the skimmer. I much prefer my skimmer to run consistently and safely rather than checking on it every day and risking water damage to my floor and cabinet.
Warranty & Lifetime
The manufacturer gives us a 1 year warranty. Pretty simple, but there is something to note: the protein skimmer itself should not be able to break. The only component you may ever need to replace is the water pump. As long as water runs through the skimmer, it will produce bubbles. The rest of the skimmer is just a complex way of making the micro bubbles in such a way that produces skimmate efficiently.
If you do ever need to replace the skimmers pump, it is the SP1000. You could probably fit other small pumps on there for a lower cost. Unfortunately mine never broke, so I never got to have the experience of substituting in another aquarium water pump. If you do not get one that is specifically a needlewheel water pump expect to change how you adjust the skimmer.
Summed up
The bubble magus is a solid choice when it comes to protein skimmers. There are larger versions like the Curve 7, making it suitable for most any tanks. The cost is a bit high but still lower than many other protein skimmers that compete with it. Would I be able to recommend this skimmer to someone? Absolutely. Every skimmer takes some work to set up, so I don’t find the difficulty of this one being any more off putting than another.