View On Amazon
| Tank Size | Filtration Stages |
Noise Level | Longevity | Price |
| 40-92 Gallons | 5 | Low | 4+ Years | Medium |
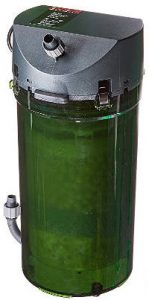
The Eheim Classic External Canister Filter brings high strength and good old reliability to the tank. It brings five stages of filtration, multiple levels or air tight valves and plenty of free filter media to keep the tank clean for years to come. The sturdy design helps to soundproof the filter, making it dead quiet. All tubing, suction cups and a spray bar are included with the filter.
Be prepared! Setting this filter up is a bit more work than most filters, however it is definitely worth the 10-20 minute investment.
Dimensions
- Eheim 150/40 gal
- Height: 11.4″
- Diameter: 4.33″
- Eheim 250/66 gal
- Height: 13.97″
- Diameter: 6.3″
- Eheim 350/92 gal
- Height: 14.56″
- Diameter: 7.28″
Set-up
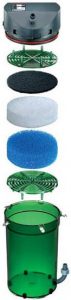
For this portion I highly recommend watching the video provided above, as there are a lot of steps you will need to take. To start you will need to open the filter. Inside will be several layers of filtration. There will be some separate bags of bio-media. Take these out of the bag and rinse them off before using the filter, as they will have dust and debris. There will also be a cardboard protector inside the filter, keeping the insides from scratching the canister filter during shipping. Remove this as well.
With everything removed you can give the filter a quick rinse and reassemble it in the order shown to the right. Place the larger pieces of bio-media on top of the first screen and the second larger bag on top of the coarse blue filter media. Give the filter a good firm shake after adding each media to even them out in the filter. If you don’t do this everything may not fit into the filter.
With everything in place clip the top back onto the filter. Check to make sure the tube on the bottom of the filter is screwed into place. It often comes a bit undone during shipping.
The included tubing comes in 594, which is 5/8″ and 494, which is 1/2″ tubing. For the 5/8″ tubing you will need to remove a 4″ section. For the 1/2″ tubing you will need both a 2″ and 4″ piece. These will be used to connect the spray bar assembly and double tap connectors. The spray bar attachment will be connected to the green j tube using the 2″ piece of 1/2″ tubing.
Next you will need to use the two 4″ tubing to connect the double tap connecters to the canister filter. Be sure the valves are facing upwards when doing this. Also be sure to thread the lock nuts, as they will be holding the tubing in place.
Next you will need to measure how much tubing your filter will need on both ends. This is best done by placing the canister filter in its final home as well as putting the intake and output in place. to make things easier you may want to place these two at the front of the tank. Take the rest of the tubing and measure how much is needed to connect the filter and the intake/output. Cut the tubing so that you have about two inches of slack. The canister filter should now be almost completely set up.
Included with the canister filter are several suction cups, which you can use to hold the spar bar in place. If you like to keep the water level higher, you may need a different form of attachment to keep the spray bar in place. Unlike sumps there is no real threat of a reverse siphon, as the canister filter will create a completely closed circuit. Simply put there is no danger when submerging the spray bar.
The last step will be priming the canister filter. This is done by creating suction on the tube that connects the canister filter to the spray bar. Disconnect the tube from the spray bar, apply suction however you like until you see water rushing down the opposite tube into the filter. Then quickly connect the tube back into the spray bar. The spray bar will then begin shooting out bubbles, occasionally a bit of water, as the filter fills up. Once the filter is completely filled with water you may plug in the canister filter. The filter will make a bit of noise and occasionally shoot out air for a few minutes before being reduced to a near silent hum. If you have a closing cabinet for the filter this should not be audible with the door closed.
That’s it, the filters all set up. Just remember to use a drip loop with your electrical cord. this will keep water away from the outlet and prevent any fire hazards.
Cleaning
Eheim recommends cleaning this filter no sooner than every 8 weeks, as doing so will harm the bacteria colonies.
When cleaning out the canister filter you have a few options. You can either rinse and reuse a lot of the filter media, which I will typically do if the filter has not been in use that long, or you can replace it if it is too dirty to reuse. Simply remove the intake from the tank, allowing the output to run for awhile. This will drain a large portion, of the water from the filter. With it drained unplug the filter and allow the water some time to settle. If your spray bar is submerged you will need to remove it from the tank before doing this, as it will start a reverse siphon otherwise. You should be able to disconnect the filter without issue now.
Take the Canister filter over to the bathroom or wherever you will be cleaning it and bring two half full buckets of tank water. Open the canister filter and remove the filter media. You will then need to decide if you ware reusing or replacing it. As for the bio-media you will want to place them each in one of the buckets and swirl them around. This will remove the debris without removing too much of the beneficial bacteria. This only works if you are using tank water. Tap water will kill the bacteria.
You may also use pipe cleaners to clean out the tubing if it seems dirty. For the impeller you will need to use a soft, non abrasive material. Its base is magnetic and must not be scratched by any hard sponges, scrubbers or bristles.
Put everything back into the filter in the order you removed it, or using the above shown picture, and put the filter back into place. You will then need to follow the final steps of the set up process again to get the pump started a second time. Remember to thread the lock nuts to prevent spills.
Warranty & Lifetime
The Eheim Classic Canister filter is covered by a one year warranty, which is mostly in place to catch any faulty parts that may have snuck through assembly. Once that period is over the canister filter should run happily for over 3 years with ease.
The only component that may break down is the impeller, which can often be replaced for around $10. Always contact Eheim before replacing any parts, as they may be willing to send you a replacement for cheaper or even free.
The filter media can be rinsed and reused or replaced, making the filter as expensive as you want to maintain. Overall This is a powerful canister filter that is a bit difficult to get running in the first place. After that however it’s smooth and quiet.