View On Amazon
| Tank Size | Noise Level | Longevity | Price | Rating |
| up to 75 Gallons | Low | 3+ Years | Medium-low | 6/10 |
After using Eshopp’s fantastic overflow box for my bedroom tank, I was really excited to try out the Eshopp’s Protein skimmer. While it did a great job making skimmate after adjusting, it would often need re-adjusting. If I didn’t keep re-adjusting it the skimmer would overflow onto my bedroom carpet. I quickly switched it to one of my basement tanks, as the spills didn’t do much there, to see if I could find a perfect setting where it wouldn’t keep overflowing with bubbles. Unfortunately the longest I got this skimmer to work without an overflow is 8 weeks.
Would I recommend this skimmer? Not really. you will need to mess with it every few days and wont be upset when the bubbles spill on the floor. I have also heard of some issues with the construction of the water pump, but mine looks fine even after a couple months of use. The only thing going for this skimmer is when it works, it works well.
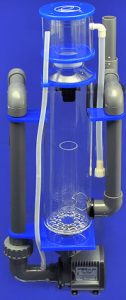
Features & Dimensions
- The needle wheel impeller helps make smaller bubbles, creating a dense foam. This greatly increases skimmate extraction.
- Unique hang on back style allows the skimmer to sit outside the tank. This removes the need for a sump.
- The elongated tube just before the slant neck means less bubbles are needed for the skimmer to work. This reduces strain on the skimmer, making it last longer.
- A completely closed circuit means there is no issues if the power goes out. Overflowing is possible.
- PK 75
- 7″W x 6″L x 23″H
- 4″ Diameter
- PK 100
- 7″W x 7″L x 23″H
- 3″ diameter
Set-up
The Eshopps included manual does an alright job at explaining how to put their protein skimmer together. Having this diagram with the labels certainly does help.
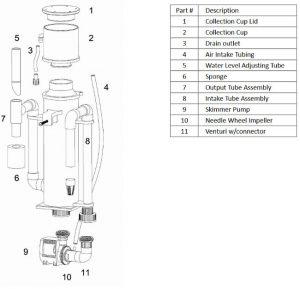
Before you start putting the Eshopps protein skimmer together take every piece out of the packaging and give them a quick rinse. If you skip this you risk introducing the factories chemicals or dust into your tank.
With everything rinsed you should start out with the pump and skimmer body. Attach these two, using a little force to make sure they are tightened. The pump will be hanging on the bottom of the skimmer so you really need to make sure it’s on there. With that done insert the water level adjusting tube, which is labeled 5 in the diagram, to the out take tube assembly, which is 7. Line up the white dot on the water level adjusting tube with the white dot on the out take tube.
Attach the sponge, 6, to the bottom of the output tube assembly and insert the collection cup, 2, into the skimmer’s body. Now insert the drain outlet tubing, 3, in the white drain outlet on the side of the collection cup. Next insert the air intake tubing, 4, to the venturi, 11, and slide the other end through the holder on the top of the chamber. The skimmer is now ready to be hung on the side of the tank and secured using the bracket screw.
Once you are ready to start the skimmer, remove the collection cup and fill the skimmer with water. Fill it up to the top of the tubing inside the main body of the skimmer. Bend the air intake tube so that no air can get in and plug in the skimmer. Once it has started you can let go of the air intake tubing.
Adjustments
This is the part that killed the skimmer for me. It may just have been my unit, but I could not get the skimmer to work properly for an extended amount of time. I had to keep adjusting it every few weeks.
- How to adjust the amount of bubbles
- Turn the adjusting tube to the right to increase the bubbles
- Turn the adjusting tube to the left to decrease the bubbles
In reality you should be changing the water level inside the protein skimmer, but it is much easier to visualize the change in bubble height. You want the bubbles to come just up to the top of the skimmers collection cup, but not so high that the bubbles actually make it to the cup. The idea here is that the skimmate in the water will be lifted by the bubbles to the top of the tube, where the bubbles will pop and toss the skimmate into the collection cup. If the bubbles go too high you will have a lot of water along with your skimmate. This means you will need to add more water to your tank more frequently as well as empty out the skimmate cup more often. Certainly something you want to avoid.
Warranty & Lifetime
The pump provided with the skimmer is excellent, however some people do find issues with the overall construction of the skimmer. Over the year and a half I used the skimmer it held up fine, but if the tubes do make a leak they should be easy enough to replace. Just use either flexible tubing or PVC pipes.
Eshopps offers a 2 year warranty for the pump and a 1 year warranty for the skimmer. Realistically your skimmer itself should not break down. Only the water pump should be able to wear out. This makes Eshopps warranty one of the better protein skimmer warranties out there.
Summed up
If you can get this skimmer to work well for you it can produce some of the best, worst smelling (A good thing) skimmate there is. Over a year and a half I never got it to run consistently. Setting it up and adjusting the bubble level is fairly easy and straight forward. I really just wish it was easier to set and forget.