View On Amazon
| Tank Size | Filtration Stages |
Noise Level | Longevity | Price |
| 100 – 400 Gallons | 4 | Very Low | 5+ Years | High |
The Fluval FX series canister filter is not for people who think they might be into the aquarium hobby. It is for serious fish keepers with demanding tanks. Large goldfish, multiple tangs, triggers, puffers and the like. If you have owned large fish like these, you know they need some powerful filters, otherwise they leave a lot of debris in the tank.
For these guys the power of a Fluval FX series canister filter is required. With its long lifetime and excellent warranty, this is one piece of equipment that can easily outlast the tank.
As the canister filter has advanced it now includes a circuit board with the motor. This will help control the motor depending on the pressure and flow that the filter is receiving, helping reduce stress on the components as well as reducing any noise created by the filter.
Specs
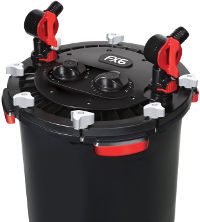
- Fluval FX4
- Suitable for 100-250 gal tanks
- Max Head Height: 6.9′
- 15.6″L x 15.6″W x 17.7″H
- Wattage: 30W
- Pump Output: 700 gph
- Filter Circulation 450 gph
- Fluval FX6
- Suitable for 250-400 gal tanks
- 16″L x 16″W x 21″H
- Max Head Height: 10.8′
- Wattage: 43W
- Pump Output: 925 gph
- Filter Circulation: 563 gph
Set-up
The Fluval FX series is perhaps one of the easiest canister filters to work with. To start simply undo the eight white knobs located on the top of the canister filter and then remove the lid. With that done find the small red T handles located on the sides of the filter baskets. Lift these up and they will bring all three baskets out with them.
From here you should remove each basket individually and rinse out the supplied media. The included biomedia will likely be bagged, however it should still be rinsed as well. Keep in mind that after the filter has been running you will not want to rinse off the biomedia. This is the only time you will rinse it.
After all the media has been rinsed you can place each basket back into the tray before placing it back into the canister filter. They come in this order
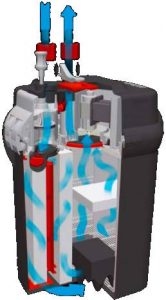
- A fine black mechanical filter media on the top
- Bio media to house beneficial bacteria in the middle
- A Chemical filtration basket on the bottom
Depending on what your tank needs you can swap out the chemical filtration part, however I like to stick to the activated carbon.
Now you will need to check the bottom valve on the canister filter. This is the purge valve, which can be used to quickly drain the canister filter. This is makes it much easier to move the canister filter for cleaning, as it can hold over two gallons of water making it somewhat heavy considering the hard to reach places canister filters typically reside.
To check the purge valve you will want to make sure the white cover is on with the red lock nut holding the white plug in place. Next ensure the valve is shut, in which case the Valve will be vertical. Horizontal means the valve is open, which will allow water to press against the plug. While this will no leak water, it will give you a small burst of water once you do use this valve if you do not close it before using the filter.
With all this done you will want to fill the canister filter with tank water. Use 1.6 gallons for the FX4 and 2 gallons for the FX6, then place the cover back on the top of the canister filter. Secure it using the eight white knobs and then locate the tubing and aqua stop valves. These are the two turnable valves that will be on top of the canister filter.
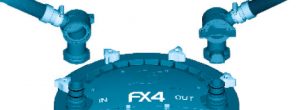
Now you will connect the aquastop valves by pushing them into place, giving them minor twists along the way. They will form water tight seals on their own. Next you will need to measure how much tubing you need for each valve to reach the tank. One will attach to the adjustable intake valve while the other will attach to the multi directional output valve. Once you are sure you have the measurements right, leaving about an inch of slack, you may cut the tubing and attach the end pieces.
Now you will want to place the tubing in the rim connectors, which are basically U shaped holders for the tubing that hold the tubes in place without the need for custom plumbing. Slide the provided suction cups into place on the inside of the rim connectors. Next you will attach the tubing to the connector via the C shaped connectors. These will snap into place in three places per rim connector. Do this for both tubes. The rim connecters can then slide into place on the tank and released. They should clamp into place, using the suction cups for a bit of extra grip without scratching the glass. You may also attach suction cups to the back of the intake strainer to hold it in place.
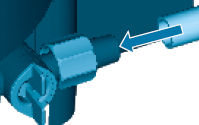
If your tank is already running you will want to attach the output tube first followed by the intake. Both of these will be labeled on the top of the filter. Push them into place and then screw them in to keep them secure. Once the intake reaches the water and the canister is plugged in it will begin running.
Notes:
When first starting the pump will run for about one minute to cycle the water in it and the tank. After this it will stop for two minutes to remove any trapped air. It will the start and run normally.
The filter will shut off for one minute every 12 hours. This is to help flush out any trapped air.

Located on the top of the filter are two handy timers to help you keep track of when you last did a water change as well as when you last cleaned out the canister filter.
Cleaning
Cleaning the Fluval FX series is a quick and easy process that should only be done a few times each year. To begin simply shut off the intake and output by turning the red valve on the aquastop valves and unplug the filter. With this done you can remove the hoses and then carry off your canister filter.
If the canister filter is positioned oddly and you need to make it a bit lighter you may drain it using the purge valve. undo the red lock nut and remove the white plug. Next connect a tube to the purge valve and place the end in a bucket. Open the purge valve and the canister filter will empty into the bucket. Once it has emptied simply close the purge valve, replace the white plug and lock the red lock nut. The canister filter should now be much lighter and can be carried with ease.
To clean the filter simply undo the eight white knobs on the top of the canister filter and lift out the filter baskets using the red t handles. This will remove all of the baskets. Replace or rinse out the filter media, but do not rinse the biomedia! This contains beneficial bacteria that the tank needs to break down harmful chemicals.
You can also rinse off the walls of the canister filter and wipe off the impeller and motors housing, which are located on the side of the canister filter. To remove the motor you will need to flip over the canister filter and undo the screws. If you remove the impeller and clean it be sure to only use soft materials, as any scratch will cause odd spinning and drastically shorten the lifetime of the impeller. Likewise the shaft is ceramic and very fragile. Treat the impeller with great care
When you are done cleaning simply put the canister filter back together in reverse order. Be sure the baskets all match one another when placed in the basket.
Warranty & Lifetime
Fluval offers absolutely amazing customer service, especially with this canister filter. Simply have your model or part number ready and call them at:
- US: 1-800-724-2436 between 8:30 a.m. and 4:00 p.m. Eastern standard time.
- Canada: 1-800-554-2436 between 8:30 a.m. and 4:00 p.m. Eastern standard time.
- UK: 01977 521015 between 9:00 a.m. and 5:00 p.m. Mon-Thurs and 9:00 a.m. and 4:00 p.m. on Friday.
Simply ask for customer service when prompted to do so. Fluval offers a three year warranty on this filter and will replace any damaged replaceable part as long as you provide the postage. They will not cover user created damage such as drops or water damage.
While the canister filter should never become completely useless, its parts can break down. This will mostly depend on how frequently you clean the filter and how roughly you perform the cleaning. Treat all the rubber carefully and do not allow it to dry or become warped while not in use. Keep the impeller clean and replace it when needed. With good care this can easily exceed four years, and when a part does fail it should always be under $20 to replace it (often $10-12). If you notice any parts are degrading it is always a good idea to order a replacement part in advance, as your tank should not be without a filter while a new part ships.