One of the biggest turn offs of aquariums is the noise the equipment can make. Typically tanks with water pumps will get to fore go air pumps, which are the loudest equipment available. Silent Aquarium Filters are great additions to quieting the tank, but the hum of a noisy water pump can completely remove the element of peace that our tanks are meant to bring.
This article was actually inspired when visiting one of my older tanks I had left to a relative, which had a cheap, loud return pump in the sump. I had originally purchased it due to its reliability, but the noise was so loud that I could not accept it, even in an older tank. I added my favorite quiet aquarium sump pump, the Tunze Silence Recirculation pump, and the tank instantly went from the noisy hum heard around the house to a silent beauty.
The look on my father in laws face is one I won’t soon forget. This however taught me that many aquarists will simply put up with a noisy pump, resenting its loudness without swapping it out. For that reason I have made this easy to follow guide for quiet aquarium water pumps.
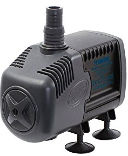
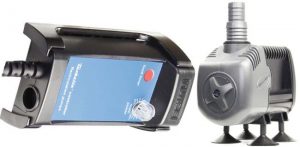
Tunze Silence Recirculation Pump
| Model | GPH | Wattage | Dimensions | Max Head | Hose |
| 1073.008 | 39.6 – 211.3 GPH | 3 – 8 W | 3.4″ x 2.63″ x 1.88″ | 1.25 m | 49″ | 1/2″ NPT |
| 1073.020 | 52.8 – 634 GPH | 14 – 30 W | 4.6″ x 3.7″ x 2.9″ | 2 m | 78.7″ | 3/4″ NPT |
| 1073.040 | 79.2 – 792.5 GPH | 16 – 42 W | 4.6″ x 3.7″ x 2.9″ | 3 m | 118″ | 3/4″ NPT |
| 1073.050 | 237.7 – 792.5 GPH | 17 – 43 W | 4.6″ x 3.7″ x 2.9″ | 3.9 m | 153.5″ | 3/4″ NPT |
| 1073.060 | 660.4 – 1320.9 GPH | 38 – 85 W | 6.8″ x 4.4″ x 3.4″ | 3.7 m | 146″ | 3/4″ NPT |
| 1073.110 | 2906 GPH | 95 – 125 W | 9.5″ x 4.7″ x 6.3″ | 4.65 m | 183″ | 1 1/2″ NPT |
Tunze has always been one of my first choices when it comes to quiet yet reliable pumps. Their products often last at least twice as long as their competitors, with the Tunze Silence Recirculation Pump being no exception. It pushes water at a consistent speed, has a low power draw and extended legs to help quiet the pump further. The pump transfers very little heat into the tank, but if you use a chiller and do not already have a return pump it is something to keep your eye on.
There are two different series: the regular series which covers most sizes and the pro series, which covers only the largest size pump. The normal series has a 2.2 meter cord while the silence pro has a 3 meter cord. Both will operate on a 230V/50Hz voltage/frequency. Additionally they have a built in safety thermostat, which will shut down the pump if it is going to damage itself by running further at high temperatures.
Setup
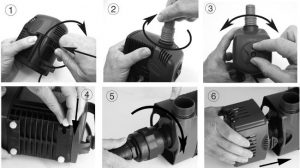
The standard silence models will follow the top row while the pro will use the bottom row of pictures.
Start by pressing the suction cups into place on the bottom of the water pump and turn them (1/4). Once turned the suction cups will be sealed into place.
Now pick the hose support/adapter you will be using. Use the table at the start of this review to see the output sizes, listed under the hose column. Screw the support/adapter into place in a clockwise motion until it stops (2/5).
Side Note: Wider tubes will support a larger, but weaker water stream. This is entirely up to your set up. For my tank, it needs to travel a large head, so the smaller more powerful stream is beneficial to me. This works as a larger volume creates a lower density, and therefor lower pressure/max head.
The performance of the normal series can be adjusted using the dial on the front of the pump (3). The grate is attached and removed on both pumps as shown in picture 6.
Assembly & Cleaning
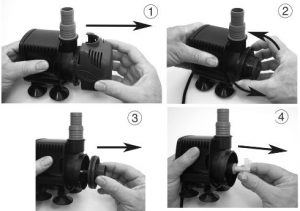
The Tunze silent water pump can be disassembled for cleaning in 4 quick steps. If you plan on cleaning the body out I highly recommend removing the pump and working over the sink.
Begin by removing the front grate (1) and twist off housing lock bar in a counter clockwise motion (2). Remove the impeller cover (3) and slide out the impeller (4) to finish.
The body can be cleaned however you choose but should not be done with any chemicals unless they are specifically made for aquarium cleaning. Instead just scrub them with a new rough sponge and tank water. The impeller and magnetic housing it came from must be cleaned with soft, non abrasive materials. Any scratches to their parts will cause improper motions of the impeller, damaging the pump and dramatically shortening the lifetime.
Warranty & Lifetime
Tunze offers a two year warranty on their silence recirculation pump along with their great customer service. As their products last for an extremely long time, often over a decade of lifetime in this case, they understand their customers need support at any time, not just during the warranty. You can expect to receive support well after the warranty ends.
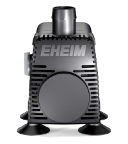
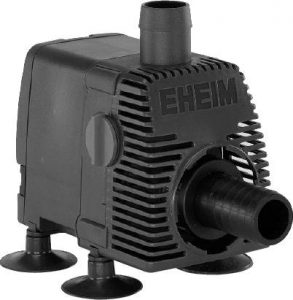
Eheim Compact+ Water Pump
| Model | GPH | Dimensions | Max Head | Noise Level | Longevity | Outlet |
| 300 | 80 GPH | 1.36″ x 2.15″ x 2.03″ | .49 m | 19.2″ | Very Low | 3-6 Years | 1/2″ OD |
| 600 | 158 GPH | 1.77″ x 3.3″ x 2.5″ | 1.3 m | 50.4″ | Very Low | 3-6 Years | 1/2″ OD |
| 1000 | 264 GPH | 2.12″ x 3.7″ x 3.07″ | 2 m | 78″ | Very Low | 3-6 Years | 1/2″ OD |
| 2000 | 528 GPH | 3.23″ x 5.43″ x 4.96″ | 2.3 m | 90″ | Very Low | 5+ Years | 3/4″ OD |
| 3000 | 793 GPH | 5.4″ x 3.2″ x 5″ | 3m | 127″ | Very Low | 5+ Years | 3/4″ OD |
Eheim is a consistent competitor with Tunze, with their products always being sturdy and efficient. This pump will not run as quiet as the Tunze, but it comes fairly close. The smaller models of the pump need more specific uses, as their heads and outputs are quite low, but the bigger models are perfect for our typical tank usage.
The price point on this pump is amazingly low, with the smaller pumps costing less than the tubing you will be using along side them. They are a bit large, but this is necessary to keep the noise level down while still maintaining consistent flow.
Set-up
Each Eheim Pump sets up just a bit differently, adding or removing one or two parts typically. The larger pumps will have more components, while the smaller will have a couple less. I will be describing the larger models, but the smaller ones can follow along just fine.
First attach the fastening strips to the bottom of the pump and attach the suction cups to the base of the pump. While most of these will offer a hanging mount, do not use it. Hanging the pump makes it much noisier.
The pump may be ran underneath the water surface or run externally. Under water is much quieter unless you can route the pump further from the living space. Keep in mind doing so will take away some of your maximum head value.
To run the pump externally you will need to remove the front cover, which is shown below (8). Connect the provided hose connector (9) to the intake and attach the tube to the connector. Make sure they are secured in place before operating the pump.
If you are running the pump externally you must be sure to prime it, as it will damage the pump to run without water inside of it.
Cleaning & Assembly
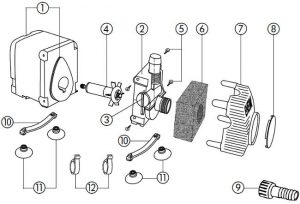 Cleaning water pumps mostly means cleaning out the grate and impeller/impeller mount. to do so slide off the grate (7) and sponge filter (6). You can rinse both of these off before returning them or replace the sponge if you would like. It is mostly to stop debris from entering the impeller, so I don’t find it too important to replace often.
Next remove the pump housing (2) if you cannot get to the impeller, which is mostly true for larger models. This is held in place by four screws on the sides. you now have access to both the impeller and its magnetic mount. Reassemble the pump in reverse order once you have finished cleaning.
Flow & Adjustments
Many of the larger models have controllable flow, via a valve on the side of the pump. It is held in place, so you do not have to worry about pulling it off and shooting water out the side like my old pump.
The flow is fairly consistent but you will not see the full strength of the pump if you are having it climb any distance. The higher the head the lower the flow will be.
Warranty & Lifetime
Eheim’s product warranty on their compact pump is Three years from the date of purchase. It is unlikely you will need this warranty however as the pump will almost always last over 5 years.
When the pump inevitably stops working it will typically be just a damaged impeller. These can be replaced easily by ordering the part. Eheim’s official manual has all the spare parts order numbers, making ordering a replacement part quick and easy.
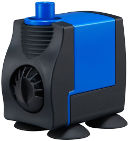
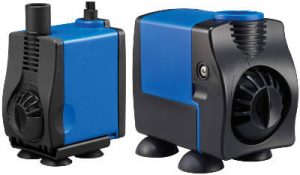
Aqueon Quiet Flow Submersible Aquarium Pump
| Model | GPH | Wattage | Dimensions | Max Head | Hose |
| 600 | 84-159 GPH | 6.5 W | 3.75″ x 2.88″ x 4.88″ | 1.17 m | 46″ | 1/2″ NPT |
| 800 | 80 – 211 GPH | 10 W | 4.9″ x 2.9″ x 5.4″ | 1.14 m | 45″ | 3/4″ NPT |
| 1200 | 106 – 317 GPH | 21 W | 4.88″ x 2.88″ x 5.38″ | 1.45 m | 69″ | 3/4″ NPT |
| 1700 | 264 – 449 GPH | 38 W | 6.25″ x 4.38″ x 6.5″ | 2.1 m | 83″ | 3/4″ NPT |
| 2300 | 317 – 608 GPH | 47 W | 6.25″ x 4.38″ x 6.5″ | 2.4 m | 94″ | 3/4″ NPT |
| 3000 | 397 – 793 GPH | 58 W | 6.2″ x 4.4″ x 6.5″ | 2.9 m | 114″ | 3/4″ NPT |
| 4500 | 583 – 1189 GPH | 58 W | 7.38″ x 4.38″ x 7.12″ | 3.1 m | 122″ | 1″ NPT |
Aqueon typically supplies entry level equipment at a good price. The Aqueon Quietflow pump however is much more than that. It runs extremely quiet, has a huge range of GPH that can be controlled on each pump and draws very little power. The pumps themselves may be a bit big, and the lack of any distance from the suction cups to the base makes them more prone to vibration transfer, but the quietflow is a pump to keep your eye on.
Each pump has a cord of six feet and use stainless steel impellers, making them more durable than most other pumps. Each pump may be controlled anywhere between 50-100% power.
Set-up
The pumps are fully assembled except for the suction cups. Simply push these into place on the bottom of the pump and it is ready to be put in place. It may be used externally, but you must prime it if you plan to do so.
While all impeller products typically have a noisy period, I feel it is more prevalent in the Aqueon Quietflow pump. It may be the steel impeller but expect the first week or 10 day to be more noisy than the rest of its lifetime. You can combat this by running it in a bucket full of water in the garage or an empty room.
Assembly & Cleaning
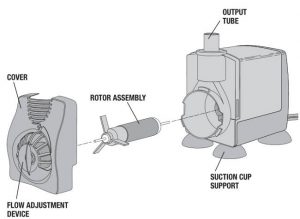
Cleaning is super quick with this pump. Remove the front grate and slide out the impeller. Now you may clean the grate, impeller and its magnetic mount. Because the impeller is steel I clean this pump every other month just to be sure it stays healthy.
If you hear the pump get significantly louder it is likely something has gotten into the impeller and cannot get out or the impeller is not sitting in the mount right. Take out the impeller and wipe it clean before replacing it and restarting the pump to fix this.
Warranty & Lifetime
Aqueon offers a one year warranty and extended support after the warranty ends. Their support is probably the biggest of the four shown here, so expect it to be fast and friendly. Just be sure to hold onto your proof of purchase.
The lifetime on the Quietflow pump is variable, with most owners seeing over two years of lifetime from this pump. Consistent cleaning will help keep the pump alive but do not expect it to last as long as the Tunze or Eheim.
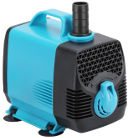
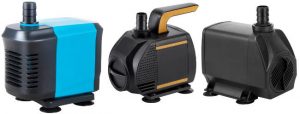
Kedsum Submersible Water Pump
| GPH | Wattage | Dimensions | Max Head | outlet | Cord |
| 121 GPH | 9 W | 2″ x 3.5″ x 2.6″ | .787 m | 31″ | 1/3″ or 1/2″ OD | 1.5 m | 60″ |
| 130 GPH | 10 W | 2.4″ x 1.6″ x 2″ | .914 m | 36″ | 1/5″ or .39″ OD | 1.4 m | 55″ |
| 550 GPH | 40 W | 2.7″ x 4.7″ x 3.9″ | 1.52 m | 60″ | .71″ or .79″ OD | 1.4 m | 55″ |
| 580 GPH | 35 W | 3.34″ x 5.9″ x 5.7″ | 1.52 m | 60″ | .55″ or .66″ OD | 1.5 m | 60″ |
| 616 GPH | 55 W | 3.4″ x 5.9″ x 5.7″ | 2.29 m | 90″ | .51″, .63″, .75″ OD | 1.5 m | 60″ |
| 770 GPH | 65 W | 3.5″ x 5.5″ x 4.3″ | 1.98 m | 78″ | .71″ or .79″ OD | 1.8 m | 71″ |
| 880 GPH | 100 W | 3.1″ x 5.1″ x 5.1″ | 3.96 m | 156″ | .51″ or .63″ OD | 1.5 m | 60″ |
Kedsum Pumps are fairly new to the market, meaning there isn’t a whole lot of information out there. The company is fairly large however, just not aquatic focused, and their pumps run quiet. They do not have the strongest nor most efficient pumps, but they are very low priced and all have adjustable flow rates.
While each model will work a bit differently, I have made sure this information applies to all the Kedsum pumps.
Set-up
Just like the Aqueon pumps, the Kedsum comes fully assembles except for the suction cups. They are pushed into place on the base of the pump.
The pumps may be used externally but must be primed before using them externally.
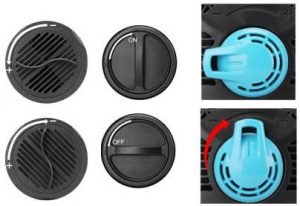
Each pump has a different dial to control the flow, which are all shown above.
Tubing
Every model comes with at least two different adapters for the outlet, which have outer diameters (OD) as shown above in the table. Because many of these adapters are various sizes, I suggest taking them to the hardware store or wherever you find low cost tubing and seeing which tubes will fit your pump or its adapters.
If you cannot find a matching tube you may use silicone to affix the closest tube to your adapter. Be sure to use food grade silicone that does not have mold protection, as any other silicone will harm fish. When using silicone it will have a one or two week curing time, during which it will let out a strong smell that is bad to breath. Keep the siliconed tube in the garage, outside but covered or in a very well ventilated area. More air flow will help speed up the curing process.
Assembly & Cleaning
To clean these pumps you will only need to remove the front grate. This will expose the impeller and its magnetic mount, allowing you easy access for quick cleaning. Remember for all magnetic mounts and impellers to use soft, non abrasive materials to clean them. Any scratches will cause improper operation and lead to your impeller wearing out much quicker than it should.
General Tubing Advise
There are typically two ways to set up your tubes: Hard tubes such as PVC pipes or flexible tubing. While both have their advantages and disadvantages, you are free to use either with these pumps.
For hard tubes I highly suggest securing them in place so that they are not free to rattle against either the tank or stand. Additionally using a bit of flex tubing near the pump will help reduce the vibrations sent through the tubes and make the plumbing a bit easier.
For flex tubing you may have the tube however you would like, so long as you ensure you are not wasting any head on excessive curling tubes. Rubber tubes will often try to stay curled, as they were shipped or sold that way. This can be undone by holding them straight and applying plenty of heat. This can be done with either a heat gun or a hot day outside. You may also do this in a hot tub of water, but that does not give you much space.
Flex tube users should also make sure to not have the tube leaning against the stand, as it will transfer the vibrations into the hollow stand and make them much louder.
