View On Amazon
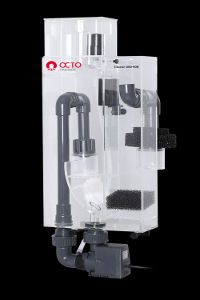
The Reef Octopus Hang on Back filter brings skimmers to sump less tanks without any draw backs. The skimmer is really easy to set up, works just as well as normal protein skimmers and actually adds water volume to the tank rather than subtract. The cost is higher than normal skimmers, but this is offset big time by not having to create a set up for the skimmer.
I originally got this skimmer to use in my 100 gallon basement display, that way if it overflowed it wouldn’t damage my carpet any. However, after using it for over a year with no spills I can say the Reef Octopus hob skimmer is certainly reliable enough to use anywhere in the house.
| Model | Tank Size | Output Size | Max Flow Rate (Gallon Per Hour) |
Longevity | Price |
| 100 | up to 110 Gallons | 25 mm | 92 | 5+ Years | Medium-low |
| 90 | up to 130 Gallons | 32 mm | 198 | 5+ Years | Medium-low |
| 1000 | up to 130 Gallons | 32 mm | 92 | 5+ Years | Medium-low |
| 2000 | up to 210 Gallons | 40 mm | 198 | 5+ Years | Medium-low |
Features
- The hang on back(hob) version of the Reef Octopus comes with a pinwheel pump, producing a good sized foam for detritus removal.
- Being hob allows this skimmer to be added to any tank at any time. No breakdowns required.
- A built in air silencer allows this skimmer to be as quiet as those hidden underneath the tank.
- An acrylic casing protects the skimmer, making it durable enough to withstand some drops and bumps.
- A specially designed Aquatrance pump helps the skimmer make a good foam while also being able to handle excess strain.
Dimensions
- Classic 100-hob
- 4.5″W x 7.7″L x 21″H
- Classic 90-HoB
- 5.3″W x 7.5″L x 23.7″H
- Classic 1000-HoB
- 4.58″W x 8.8″L x 23.6″H
- Classic 2000-HoB
- 5.67″W x 9.8″L x 24.4″H
Set-up
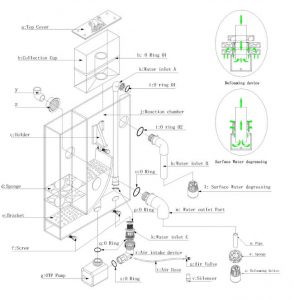
The parts may look complex, but setting it up isn’t so hard. This just gives you a good idea of what each piece is, what it does and makes the whole thing easy for me to reference. Depending on your model you may need to use the top or bottom image. The top will be for the 100 and 90 while the bottom is the 1000 and 2000.
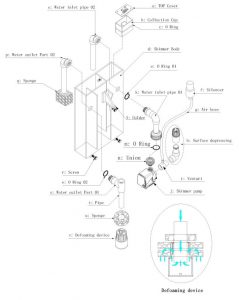
Usually I would try to talk you through how to set it all up, but for this one it is just plug in the pieces like Lego blocks. The diagram shows you exactly which piece goes where and no piece is too hard to identify. It isn’t to assemble hard but there are a lot of pieces. Be sure to keep everything organized as you put it together.
Once you have the body assembled you will need to attach the skimmer to the tank and tighten the holder screw. This helps the skimmer stay up by distributing its weight to more solid parts rather than relying on the tubes connections for support.
Next fill up the skimmer about 8 or 9 inches. switch off the air valve and start the skimmer. After a few seconds you can turn the air valve back on, once the skimmer starts working normally is when I turn it back on. Once there is a good stream of bubbles replace the air valve by the silencer.
Now adjust the water outlet so that the bubble stopper is able to come out from the surface a bit. This will be the small pipe that’s located inside the defoaming device. If all goes well your skimmer is ready to use. If you notice any issues stop the skimmer and restart the process.
Adjustments
Adjusting this skimmer is a bit strange. Rather than turn any knobs or small adjustment tubes, you need to twist the water output valve.
- How to adjust the amount of bubbles
- Turn the water output valve clockwise increase the bubbles
- Turn the water output valve counter clockwise to decrease the bubbles
Unlike most skimmers, I found this skimmer only takes a day or two to adjust to your tank. For the first day I would just adjust the tube so that you are getting small bubbles that would carry skimmate to the top of the collection cup. Don’t worry too much about getting the bubble level right just yet, as it will be changing a lot on its own. Instead let it break in for two days and then adjust it so that the bubbles are just about reaching the top of the tube that goes in to the collection cup. Do make sure the skimmer isn’t overflowing with bubbles before you let it break in.
Warranty & Lifetime
Reef Octopus offers a two year warranty on the skimmer and a one year warranty on the pump. As their pump is custom made it is really unlikely to break down. Mine is just over 15 months old and has had no issues. Even if the pump were to break I would only need to order a replacement impeller, which is dramatically cheaper than ordering a new skimmer all together.
The body should never break down since it has no moving parts. the only thing I have to note about the body is if you clean it to remove as few parts as possible. Re-assembling the skimmer is a lot harder when the pieces are a bit wet.
Summed up
Compared to the Eshopps HoB skimmer, the Reef Octopus is an absolute godsend. Even on normal skimmer standards this would be one of my first choices. I highly recommend the Reef Octopus HoB skimmer for anyone who doesn’t mind or needs an out of tank skimmer. Just be sure you have the space to install it before you order one. Moving large tanks full of water to fit it on the back is a huge headache.