| iSpring RCC7 | SpectraPure MaxCap | Aquatic Life RO Buddie | Home Master TMHP | |
 |
 |
 |
 |
|
| Filtration | Excellent | Excellent | Medium | Medium |
| GPD | 70 Gal | 90 Gal | 50-100 Gal | 10-40 Gal |
| Waste Ratio (Waste:Water) |
low | 2 : 1 | 10 : 3 | 1 : 1 |
| Warranty | 1 Year Warranty | 3 Year Warranty | 1 Year Warranty | 5 Year Warranty |
| Price | Medium | High | Low | High |
Local water supplies are dramatically different across the world. While one states water may be close to ideal for your tank, other areas may have far too many minerals in the water. While harmless or even beneficial for humans, these differences in water can be devastating in aquariums.
Thankfully the process of reverse osmosis removes the majority of minerals from waters. This means water from different areas, while originally different, will end up just about the same. This makes for high quality aquarium water and promotes fish, coral and plant life. However not all reverse osmosis filters are made equal. The best reverse osmosis filters will work quickly, with little waste and have high durability. It does us no good if the filter can only process twenty or so gallons before it must be replaced, as even small tanks will reach these small numbers quickly. Likewise we want a ro water system that will not make us wait a week for a water change.
Each of these Reverse osmosis systems have been tested for durability, speed, effectiveness and efficiency. To extend your RO/DI filters lifetime use softened water, as this will make filtering easier on the membranes.
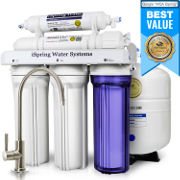
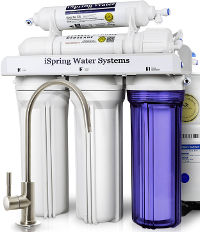
iSpring RCC7
| GPD | Filtration Stages |
Micron Size | Warranty | Price |
| 75 Gallons | 5 | .0001 Microns | 1 Year | Medium-low |
The iSpring is designed to support an entire households clean water needs. It comes at a lower than average cost as well as the option to have it installed by professionals. The components are easy to replace and last for quite a long time, making this one of the most cost effective reverse osmosis systems for aquariums and general use.
Pros/Cons
- Pros:
- Easy To Use
- Lifetime Support
- Smallest Micron Size
- Water Quality Association
Gold Seal Certified - 75 GPD Supports Any Tank
- Cons:
- Time Consuming Set Up
- Some Tools Required
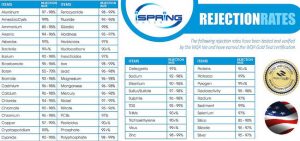
Rejection Rates
Set-up
The process is not too difficult, but will take a fair amount of time. Use the above video and follow the steps exactly. Getting impatient will only make the process more difficult. If you would like professionals to install the system for you the option is available at an additional cost.
There are also great instructions in the owners manual. I just work easier with the video.
You may use any water supply line in your house. For my system I used a splitter with the washing machine. This allows me to only use the RO/DI system when I want to, which will extend its lifetime dramatically.
The iSpring requires between 45 and 80 psi to function properly.
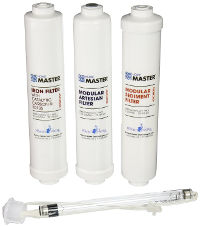
Detailed Parts List
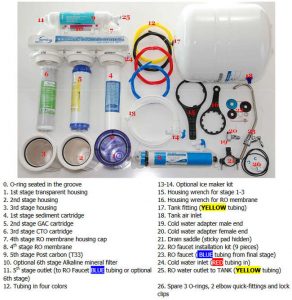
Replacing the RO/DI units components is fairly cheap and easy. The parts are sold in a low cost pack on amazon. Depending on the tank size and how often you do water changes you should only need to replace these parts every one to four years. The membrane is not included in the one year pack shown above, but is included in the three year pack. The membrane costs a fair amount on its own, making the three year a significantly better value If you plan on using the filter over 5 years.
Additionally you can add a UV light filter, making it much closer to the Home Master system at a fraction of the cost. The light costs almost as much as the system itself, which is how the iSpring can be so much cheaper than the Home Master while still being extremely effective.
Warranty & Lifetime
iSpring offers a 1 year warranty as well as a 90 day warranty on any replacement parts that are provided via warranty. You will need to either call iSpring customer service or register the reverse osmosis system on their website. Replacement parts purchased later will also receive a one year warranty from the date of purchase.
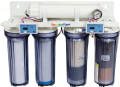
SpectraPure MaxCap

| GPD | Filtration Stages |
Micron Size | Warranty | Price |
| 90 Gallons | 4 | .5 Microns | 3 Years | High |
While the technology behind this reverse osmosis filter is a bit dated, the SpectraPure is still favored by a huge portion of the aquatic community. This is largely due to the company high standards on their products. All SpectraPure RO/DI units are hand tested to ensure their 98% rejection rate. Couple this with the dual inline TDS (Total Dissolved Solids) meters and you get a great guaranteed value.
Pros/Cons
- Pros:
- Dual TDS Meter Included
- Tested Before Sale
- Long 3 Year Warranty
- Easier Set Up
- Cons:
- Larger Than Other RO/DI Units
Set-up
The SpectraPure comes more assembled and is not designed to be used as a sink connector. This makes it much easier to install than the iSpring. It is up to you if a harder installation is a big deal.
The SpectraPure requires between 40 and 80 psi to function properly.
Replacing Parts
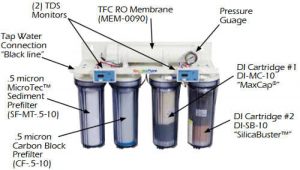
Replacing parts on the SpectraPure Maxcap is fairly simple. Each compartment screws off of the white top, giving you direct access to the cartridges and prefilters. These can then be swapped out with a new part when necessary. Unlike the iSpring the components are best purchased individually. These components are the RO Membrane, Carbon Block Filter, MicroTec Sediment Prefilter, D1 Cartridge #1 MaxCap and D1 Cartridge #2 SilicaBuster
Warranty & Lifetime
SpectraPure offers an amazing three year warranty on their RO/DI system. There is no product registration needed here. Simply keep your proof of purchase for easy service.
Replacing the sediment filter and carbon block filter every 6 months will help extend the lifetime of the more expensive membrane, while also keeping the system cleaner. Likewise using the RO system with a softened water input will reduce the stress on the membrane. Keeping the system away from direct sunlight will also keep away algae growth.
SpectraPure Recommends replacing each component every 4-6 months. The membrane must be tested to know when to replace it. To do this run the system for ten minutes. Turn the left meter on and measure the tap water conductivity. This is done by sliding the switch on the meter to the left to “IN”. Next measure the RO conductivity by sliding the switch to the right “OUT”. Finally use a bit of math: (IN – OUT) ÷ IN X 100. This will give you the rejection rate. It is recommended to replace the membrane once it falls below 95% rejection rate.
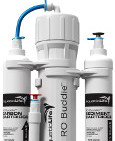
Aquatic Life RO Buddie
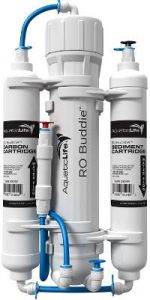
| GPD | Filtration Stages |
Micron Size | Warranty | Price |
| 90 Gallons | 3 – 4 | .5 Microns | 1 Year | Low |
The Aquatic Life RO Buddie is a low cost reverse osmosis system that can make water clean, with rejection rates that match its more expensive counterparts. It is easy to move around, allowing you to only pull it out when needed rather than install it somewhere. For those not looking to install a permanent RO system in their homes or trying to choose a more budget friendly RO system, the RO Buddie is a solid choice.
For those who know they will be using their RO system a lot, a more efficient system would likely be a better choice. The RO Buddie creates a 10:3 waste to ro water ratio. The amount of waste water produced would be quite difficult to deal with for a 100+ gallon tank. Likewise the optional fourth DI step wears out more quickly than other RO systems, making it more costly to maintain RO system for large aquariums. In short, this system is best suited for small aquariums.
Pros/Cons
- Pros:
- Great Customer Service
- 98% Rejection Rate
- Has multiple sizes
- Low Cost
- Cons:
- High Amount of Waste Water
- Can be Clogged Depending on
Geographical Location/State - Only Comes With Garden Hose Adapter
Set-up
The set-up process is very quick. You will only need to insert the membrane, connect three 1/4″ tubing and choose a location for the RO system to be.
The membrane is enclosed in its own packaging and must be placed into the large center housing. To do so, start by removing the blue clip that holds the tubing in place. Next push the connector inwards and pull the tube that goes into the connector out. This should not take much force.
With the tube removed unscrew the top of the center housing and insert the membrane with the black gasket facing upwards. Push the membrane down into the housing, put the cap back on and reattach the tubing.
Remove the three plugs as shown below:
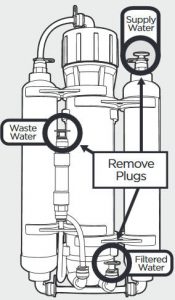
This is done the same way as with the tubing. You will need your own 1/4″ inch tubing here. Insert tubes into all three connectors, giving yourself enough tubing to lead the water to its destination. I have a 4′ tube to lead the filtered water into a bucket for my water changes, a 3′ tube to lead my waste water into another bucket for the garden, and a 2′ tube to supply my RO Buddie with water from the adapter.
As this RO system only comes with a hose adapter I highly suggest placing the RO unit by your washing machine, using a Y adapter to split the water between the washing machine and RO unit.
Replacing Parts
The RO Buddie’s components can be worn down faster than most other units. This is likely caused by its excessive waste water production. For smaller tanks this will not be much of an issue and choosing this lower cost RO system will still save money for quite a long time. Again those who know they will be using the RO system for a long time may want to get a more efficient model.
The membrane can be found here on amazon in both 50 and 100 GPD sizes. The other cartridges
Cleaning
Warranty & Lifetime
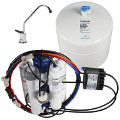
Home Master TMHP
| GPD | Filtration Stages |
Micron Size | Warranty | Price |
| 90 Gallons | 4 | .001 Microns | 5 Years | High |
The Home Master TMHP system is really the best reverse osmosis system out there. Not only does it create a steady supply of RO water, making large tank changes quick and easy, but the way it’s installed creates clean, drinkable water for every other activity in the house. The iSpring also does this, and is much cheaper, but the ppm of the water will be better from the Home Master. Additionally the Home Master TMHP system has an end of system filter to remove any materials that come off of the membranes during the osmosis process.
Some quick important numbers here would be the 99% rejection rate of major minerals as well as 99.9% of all microorganisms that are in the water. Rates this high are due to the micron size of the membranes, which is just over the size of a water molecule. This allows us to create the perfect start for our tanks, keeping both fish and incoming beneficial bacteria healthy.
One of the biggest draws, especially for me and multiple tanks, is that you only need to replace some of the membranes after 2000 gallons or around a year of use. This helps on the water bill and keeps the cost of maintenance down. Still the filters are more expensive than those of other RO systems. Sadly no money saving in the long run.
On of the bigger plus sides the applies especially to freshwater tanks is eliminating the microorganisms. Most of these will not survive in salt water conditions, however they can often thrive in freshwater setups due to the warm water and consistent feedings. This is done by the UV lighting in the third filter.
Dimensions
- For the Filters
- 16″ high
- 15″ wide
- 5″ deep
- For the Tank
- 15″ high
- 11″ Diameter
Installation
While I will describe how to put this RO system together, it is a lot easier when you see things done. Perfect water has a great, multipart video on setting up this exact model. The included manual does a good job of explaining how to set the Home Master up as well. It is not too difficult, but certainly isn’t something you want to mess up on.
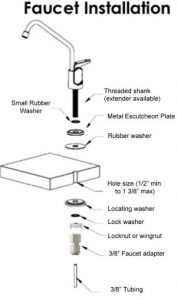
Remember to always wear eye protection when installing this system. As you will be under your sink dust and debris may fall in your face. Keep your eyes safe. Likewise keep towels around incase some parts end up not being water tight. The tubes are color coded and easy to use, but accidents do still happen.
This system, just like the iSpring, installs into a sink faucet. I found it easiest to start with the faucet on top, putting the washer, metal plate and then small washer around the pipe that will be going down under the sink. For the bottom you will need the locating washer, followed by the lock washer, locknut and faucet adapter in that order. This will connect to your tubing. Mine came with 3/8″ and attached perfectly.
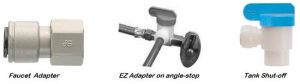
From here you will need to install the EZ adapter on your cold water line. Find your cold water angel-stop. There should be two of these lines under your sink, one for hot and one for cold. Turn this clockwise to shut off the water. Next find the 3/8″ fitting, which should be found on the line out of the angle-stop/where the existing line connects to the faucet.Take off the 3/8″ fitting on either the kitchen faucet or the angle-stop. Using Teflon tape on the EZ adapter and the male threads of the angle-stop, making sure o-rings are properly seated. Connect the EZ adapter and tighten it. Ensure that the EZ adapter ball valve is closed. Check for water pressure and leaks on the ball valve before moving on. Turn the handle perpendicular to the tube to close the EZ adapter valve.
Remember to keep a towel, bowl or bucket under to catch water, because around now is when you should get some left over water. Open the angle-stop valve by rotating it counter-clockwise. Dry everything off, look for leaks and ensure everything is tight and in place.
Lifetime And warranty
The tank itself should never need to be replaced, however it is recommended that you replace the membranes around every 2000 gallons. They also suggest once each year, but this may be a bit too often if you are not using the system too much. By using an RO meter you can see just how effective your membranes are. If you find your ppm hasn’t changed since you first installed the unit then there is no reason to replace the membranes.
The membranes do not start wearing down before use, meaning you can order them before you think you will need to replace them. Worst case they take up space until they are needed. Just do not get the membranes wet while they are in storage.
The Home Master TMHP RO system comes with the best warranty out of all the systems at 5 years. When components, such as the sink faucet, break you can expect them to send a replacement and any tools necessary to get your RO system back up and running.