View On AmazonPros:
- Wide variety of built in settings to choose from
- Internal memory protects against power outs
- Manual programming available
- Easy to use and program
- Accurate to the minute
- Full control via remote
- Complete day night cycle including moonlight
- Stops all power to light saving money in electricity
Cons:
- Not water proof
- Short remote range
- Not compatible with some high end lights
The Current USA Pro Timer is a step above the more commonly seen one or two ramp timers. While those work perfectly fine they do not offer the degree of customization that the Pro does.
Unlike the other timers the pro allows owners to utilize their blue moon lights as well as dim the blue lights intensity. This allows for absolutely perfect day/night cycles in the aquarium. An absolute must for the best aquarium lighting
Installation
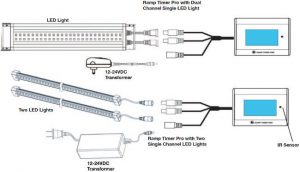
To begin installation you must first remove all power from your current light fixture. Next you will be taking the male outputs from the timer and connecting them into your light fixture. After that has been complete you will take the female connector and connect in with the rest of the original lights cord. This will complete the circuit between the light, timer and power outlet. Ensure the connection worked by returning power to the light.
Remember to always install a drip loop. Because the timer itself is not water proof you may need up to three loops. Two to protect the ends of the timer and a third to protect your outlet. Never underestimate the value of drip loops.
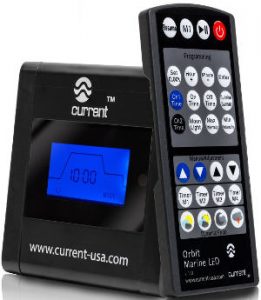
Buttons
Before we learn how to program the timer we will first need to take a look at the remote. We will be working our way down the remote from left to right.
Row 1 | Programming
Resume: Exits the dynamic mode and resumes the timers set lighting schedule.
M1: Allows the owner to select the color spectrum/brightness.
Default: Resets the four memory settings of M1, M2, M3, and M4 to factory default.
Power: Turns the light on/off.
Row 2
Set Clock: This is used to set the current time of day.
Hour+: This is used to adjust the hour setting of the clock as well as any + settings.
Minute-: Changes the minute setting of the clock and is used for all – settings.
Enter: Stores the settings into memory.
Row 3
Ch1 Time: This is used for programming the 1st channel, which is typically the blue lights.
On Time: This selects the on time of the 1st channel during programming.
Off Time: Selects the off time during programming.
Sunrise/Sunset:This is used to program the ramp up/down of the light.
Row 4
Ch2 Time: This is used to program the second channel, which is often the white lights.
Moon Light: This is used to program the duration of the blue moon light.
Max Intensity: This will adjust the max intensity for each channel.
Min Intensity: Conversely this will adjust the minimum intensity for each channel.
Row 5 | Manual Adjustment
Blue Up/Down Arrows: Changes the blue lights intensity.
While Up/Down Arrows: Adjusts the white lights intensity
Row 6
Timer M1/M2/M3/M4: These are used for storing light schedules into the memory of the timer. These come with pre-set settings but can be changed. To use the setting press the button once.
Row 7
Two Clouds And Sun: Provides the tank with a small amount of cloudy weather.
Three Clouds And Sun: Creates a more cloudy lighting effect.
Moon and Cloud: Creates a cloudy night cycle.
Thunderstorm: Creates a thunderstorm effect in the tank(Not recommended!)
Programming
To program the Current USA Pro Timer you will need to take the remote and get comfortable. Here are the pre-set options on the timer.

If you see a setting that suits your needs there is no need to program further. However the timer is capable of a lot of variation which we will cover.
The begin programming you must first select one of the m slots to hold these settings. After selecting between m1, m2, m3, m4 we can begin.
Remember each step can be completed independently via the CH1 and CH2 buttons.
first you need to set the on/off times. This is done by pressing the ON TIME button. ON1 or ON2 will flash depending one which channel you are setting. Press the Hour+ and Minute- until the time is where you would like it. The enter button is then used to store these settings.
Next we will be setting the sunrise/sunset durations. To start select your channel and press the Sunrise/Sunset button. FADE will flash and fade, then displaying number of minutes currently selected for the gradual ramp up and fade. This is can be changed between a 0-30 minute range. Personally I keep this at 30. Us the minute- and hour+ buttons to change these and always save your settings using the enter button.
Now we will set the Moonlight duration. Again we do this for both channels. Press the Moonlight button and N1, N2 will flash depending on which channel you are using. Using the minute- and hour+ buttons set the duration to your desired settings, anywhere between 0 to 6 hours. Press enter to save the settings.
Our second to last step will be setting the intensity of our lights. This is important as always using max intensities is inviting algae growth to our tanks. First press the Max Intensity button and b1H or b2H will flash on the screen, one per channel. Use the hour+ and minute- buttons to set the intensity anywhere between 0 and 100%. Remember if you want the moonlight to run all night do not set the lights to fade to zero. A zero light moonlight setting runs but the light is never on. Keep the min intensity to say 5-10% for a waxing moon effect. press enter to save the settings.
Once you have finished adjusting all of the settings you may now hold the same M button you had previously selected for five seconds. SL-# will display with the number being whichever M slot you have chosen.
Factory Defaults
If you replace one of your more favorite default settings or would like to go back for any reason you can simply hold the Default Settings button for five seconds. This resets all of your settings so use with caution.