View On Amazon
| Tank Size | Noise Level | Longevity | Price | Rating |
| up to 250 Gallons | Low | 5+ Years | Medium | 8/10 |
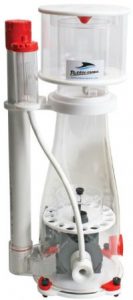
One of the most well known protein skimmers around, the Bubble Magus Curve 7 is hard to match in both value and effective skimming for the home aquarium. It is extremely easy to adjust how powerful the skimmer is running, making finding the sweet spot between overflowing with bubbles to not even reaching the cup a breeze. If your tank is 150 gallons or less I would highly recommend you jump on over to the Bubble Magus Curve 5 Review page.
Keep in mind that, like all skimmer, the Bubble Magus will require a decent amount of adjustment before it runs perfectly in your tank. While it is easy to do this it will take awhile. This is because of the slow nature of protein skimmers and the difficult to measure bubble column. Additionally new skimmers should be given a week to adjust to your aquarium. Over this time the amount of bubbles produced by the protein skimmer will vary wildly, making any small adjustments pointless.
- Features
- The pinwheel needle with ventui inlet combo creates an extremely dense foam, which does an amazing job at trapping skimmate with minimal water waste.
- The powerful wineglass structure makes the bubble magus highly durable while keeping its volume down.
- The smaller body means less bubbles are required, which puts less stress on the water pump and skimmer.
- The water output tube on the left of the skimmer makes adjusting the bubbles/skimmer a breeze
- The compact design allows the bubble magus fit where other skimmers won’t.
- The padded rubber feet make this a silent protein skimmer
- Dimensions
- 10.8″W x 10.5″L x 21″H
Set-up
The included manual is pretty bad, however I will make use of this great image it has inside.
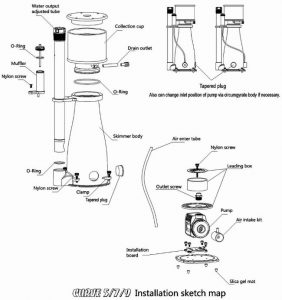
The Protein skimmer does not come fully assembled. You will get the body, water pump, skimmate cup and leading box along with all the tubing we will need. Puttting the skimmer together is pretty easy when you know how to, however the manual does not cover this at all. Before we start, rinse off all of the components so that we dont bring in any of the factories chemicals or dust.
After you have rinsed everything off we can begin assembling the Bubble Magus. Start out by loosening the four nylon screws located at the base of the Bubble Magus. This will let you remove the base from the protein skimmer. With that done remove the small white rubber clip attached to the base. Next slide the waterpump onto the installation board, putting the cord where you removed the rubber clip. Reattach the clip when the pump an its wire are in place.
Next comes the three parts of the leading box shown in the diagram. Put the bottom part onto the pump along with the outlet screw. Fasten the screw before putting the rest of the leading box in place on top of the base. Secure this with the long nylon screw.
With the leading box taken care of put the base back onto the skimmer body and tighten the 4 nylon screws. Connect the tapered plug to the front of the skimmer and connect the muffler near the skimmate cup. These is a small spot it fits just by the water output adjusting tube. Now connect the air intake tube to the tapered plug and muffler.
I choose to cut some of the drain outlets tubing off, as I don’t use it. It just isn’t worth the effort. Connect the shortened hose onto the skimmate cup. The Magus is now ready to use. Put it into the tank and let it start its break in period, which can take up to a week.
Adjustments
There are two ways to adjust the Bubble Magus Curve 7. The first way is to turn the water output tube, located on the side of the skimmer. This is the easiest and most reliable way.
- How to adjust the amount of bubbles
- Turn the water output tube counter clockwise to increase the bubbles
- Turn the water output tube clockwise to decrease the bubbles
Some tanks may need the Bubble Magus to be in a different depth of water. You can either lower the water level or raise the skimmer. I choose to make mine as deep as possible to add more water to my entier system.
We want the bubbles to come near the top and pop, not overflowing even a little bit. If we allow bubbles to the very top or over the cups intake we will be putting a whole lot of tank water into the skimmate cup. This means we will have to clean the skimmer more often and lose out on a lot of our water. A good bubble level should take a few hours to produce any real ammount of skimmate. Remember these will be running non-stop. Taking a bit of stuff out of the tank every hour adds up fast. Overflowing the skimmate cup with bubbles won’t make this faster.
Warranty & Lifetime
The Bubble Magus Curve 7 comes with a one year warranty, which is pretty straight forward. What we do need to take note of is how the skimmer can break. Unless you personally break the skimmer, the only part that could ever need to be replaced is the water pump, maybe the tubing if you stop using it and let it get clogged.
If you do ever need to replace the skimmers pump, it is the SP1000. Other water pumps may be able to be used in its place, but I personally have not tried this.
Summed up
This is a solid protien skimmer that is give3n a lot more flak than it deserves. Any protein skimmer will give you the same issues when setting up and adjusting the bubbles. It feels a bit unfair at this price point, but you can’t expect any manufacturer to predic how bubbles will act in your specific set up. Would I recommend this to anyone who asked me? Unless their tank is small enough for the Bubble Magus Curve 5 then yes I most certainly would.