View On Amazon
| GPH | Wattage | Dimensions | Max Head | outlet | Cord |
| 121 GPH | 9 W | 2″ x 3.5″ x 2.6″ | .787 m | 31″ | 1/3″ or 1/2″ OD | 1.5 m | 60″ |
| 130 GPH | 10 W | 2.4″ x 1.6″ x 2″ | .914 m | 36″ | 1/5″ or .39″ OD | 1.4 m | 55″ |
| 550 GPH | 40 W | 2.7″ x 4.7″ x 3.9″ | 1.52 m | 60″ | .71″ or .79″ OD | 1.4 m | 55″ |
| 580 GPH | 35 W | 3.34″ x 5.9″ x 5.7″ | 1.52 m | 60″ | .55″ or .66″ OD | 1.5 m | 60″ |
| 616 GPH | 55 W | 3.4″ x 5.9″ x 5.7″ | 2.29 m | 90″ | .51″, .63″, .75″ OD | 1.5 m | 60″ |
| 770 GPH | 65 W | 3.5″ x 5.5″ x 4.3″ | 1.98 m | 78″ | .71″ or .79″ OD | 1.8 m | 71″ |
| 880 GPH | 100 W | 3.1″ x 5.1″ x 5.1″ | 3.96 m | 156″ | .51″ or .63″ OD | 1.5 m | 60″ |
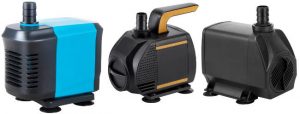
Kedsum, while a decently large company, is fairly new to the aquatic world. Regardless their water pumps compete with some of the best brands, offering great water movement without too much noise. The heads vary greatly depending on the model, however there should be a pump to suit most aquarium owners thanks to the adjustable flow rates.
While there are large differences in the performance of the different models, each one operates similarly. I have ensured that all information here will apply to each pump.
Set-up
Each pump comes fully assembled, with only the suction cups left to apply. These go on the base of the pump with a small amount of force and should stay in place after application. There are four in total and should all be used simultaneously. A three legged pump will be much more noisy than a four legged.
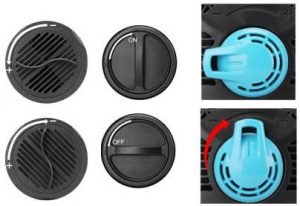
The flow of each pump can be adjusted using the dials on the front of the pumps as shown above.
Tubing
Each pump comes with at least two outlet adapters, which have the above listed outer diameters(OD). This means you will need a tube with similar or slightly smaller inner diameters to fit onto the adapter. It is easiest to find the right size tube by taking the outlet adapters to a hardware store that sells tubing.
If you cannot find a matching tube you can buy a slightly larger tube and use a food grade silicone to seal the tube to the adapter. For this method be sure your silicone does not have any anti mold properties, as this will harm your fish. Additionally the silicone will take a week or two to cure. During this time it will not have full strength and will be releasing a strong smell. Leave the tube in a well ventilated area or outside for the duration of the cure.
Once you are ready to connect the tube to the tank be sure of a few things. If you will be securing the tube to the tank be sure to use a few flexible tubes, as only hard tubes will end up being louder. For loose tubes be sure to keep contact with the stand to a minimum. A tube touching the stand will transfer and amplify its vibrations through the hollow stand.
For my tanks, quieter is better. To do this I keep the pumps fully submerged. While these pumps can be used externally, I find this increases their volume.
Remember: never let your pump run dry. Always ensure the pump will be receiving water when on or turn it off once it runs out of water.
Assembly & Cleaning
Each pump has the same grate covering the impeller design, making disassembly and cleaning a breeze. Start by pulling off the front grate. This may be more difficult as the pump ages and collects debris and algae from the tank. Once removed you may slide out the impeller. These should both be cleaned, as well as the magnetic mount that the impeller was removed from.
When cleaning the impeller and its magnetic mount be sure to use soft, non abrasive materials such as a cotton swab. Any scratches to the impellers magnetic components will cause dramatic changes in performance.
Looking for more information on quiet aquarium water pumps? Read our full guide here.