
For the purposes of this guide we will be building the wet/dry filter in an aquariums sump. If you do not have one already then you should look into our guide on building your own sump. A sump will give you access to a multitude of benefits including our wet/dry filter design.
Remember to always measure where you components will be. Again as this is being placed in a sump you must ensure your sump will fit in its desired location. Most aquarium stands have large open areas with a cut out top, allowing sumps and other equipment to be lowered in. If you have a large established tank you will need a smaller container that you can fit through the other openings.
Wet Dry Filter: How it Works
Before we build the wet dry filter, I would like to explain what the wet dry filter is used for. Some owners may be building these for the wrong reason and may be looking to do something entirely different. So lets discuss what these filters actually do.
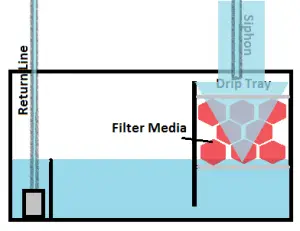
As water is siphoned from the main tank it lands on top of our wet/dry filter. The water then finds its way in through one of the many holes in our drip tray and enters our wet/dry filter system. Next the water passes through our filter media, which can be anything from house hold metal scrubbers or bioballs, and continues to flow through the sump before returning to our tanks via a return pump. This is a simple process that actually creates the strongest possible biological filtration a tank can have, far exceeding vast sand beds and mountains of live rock.
The reasoning wet/dry filters create such a strong biological filter is simple. High surface area combined with oxygen rich wet surfaces. This is the ideal area for bacteria growth as most owners will see using normal hang on back filters. However by creating a large wet/dry filter with the sole purpose of building this bacteria, the beneficial bacteria finds no shortage of space and will easily grow to match your tanks waste production.
How to Build a Wet Dry Filter System
What you will need:
- 2 Plastic Dividers
- Drill
- Ruler or Straight Edge (Optional)
- Filter Media, I use Bath Sponges for the lowest cost (Amazon)
- food grade silicone (Amazon)
- Egg Crate, buy from home depot or similar store. It’s with lighting sold as a light diffuser. Online prices are absurd
All in all about $30-$40.
Measuring
Your first step is to measure out the dimensions of your soon to be wet/dry filter. If this is an aquarium sump you want to leave about two inches of space above the top of your wet/dry filter with an additional one inch of empty space. This allows water to collect before dripping through the drip tray, reducing noise and stress on the drip try. Mark this line with whatever you like. Personally I used tape on the outside of the tank. If you use tape be sure to remember if the top, middle or bottom served as your measuring spot.
Next will be the width of your wet dry filter. I combined three of the sponges and made the filter that long. You should allow for more space than the current amount of filter media you currently have. Most people will want to add more after seeing the benefits these filters bring.
Last of all measure bottom of your wet dry filter. This will determine how much water is allowed to stay in your sump. The following sections in your sump must have the same level wall or the water will build up into your wet dry filter, making it just submerged media. As shown in my diagram you should only have a small portion of the wet dry filter submerged in water. This will help alleviate the noise of dripping water. My first wet dry filter did not have this and was quickly replaced. Aquariums in the bedroom so it has to be quiet.
Now you should have a box of lines/tape outlining the side of your sump. The left side determines the width, top side allows for water pooling(noise reduction) and the bottom determines the in sump water level. You will now want to move the sump into a well ventilated area. Bring the egg crate, plastic divider and silicone with you.
Silicone The Divider Into Place
Place the sump somewhere where it will not be in the way and can sit for 2-7 days. Why is this? Silicone must be let to sit while it “cures”. During this time it is toxic to fish and releases a strong smell caused by the acetic acid leeching out of the silicone. Small amounts of silicone will cure in one days time, but with out wet/dry filters being under constant water flow I like to use a more generous amount of silicone. When layered thick the silicone can take a week or more to cure.
Do not get impatient! Using un-cured silicone is toxic to your fish and has far less strength than fully cured silicone. While the fish may live from partially cured silicone, the wet/dry filter may fall apart if the water flow gets too strong. If you are making this wet/dry filter for a huge tank, with a sump over 50 gallons big, you should give the silicone a full month to cure. Better safe than sorry.
Clean left side falls while messy right side holds. Don’t be afraid to use more silicone.
Safety talk out of the way, you should not place your left divider in place and silicone it in place on both sides. Move slowly and allow the silicone to spread. Make sure there are no air bubbles or gaps. Leave about two and a half inches on the top inner side of the divider un-siliconed.Allow the silicone to sit and strengthen while we begin the next step.
Creating The Drip Tray
To create our drip tray you will need to break out your drill and measuring device. Honestly you don’t need to measure the holes distance but it looks professional to do so. Lay your plastic top, which will be serving as your drip tray, where you will be able to drill it. I personally measure the holes about 3/4″ apart. The easy way to do this is to make small marks along the top and side of the plastic top at 3/4″ increments. Next you lay your straight edge on the top and make lines at each mark, creating a grid on the lid. Each intersection shows where to drill a hole, leaving your top looking clean, professionally and more importantly effective. For smaller tanks start out using 1/8″ holes and work your way up when using larger tanks. Creating too small holes will prevent the water from draining fast enough and will cause the water to flood over the top. This is why we leave space above the top of the wet dry filter. Should any clogs manage to occur the water will fall harmlessly into the sump and continue its normal path.
Drip tray complete.
Base of Wet/Dry Filter
Finally we will make the base of the filter that will hold your filter media. This will be made out of your egg crate. Using scissors or a wire cutter, cut the egg crate to fit to the size of your base. Not much else to it. If you are choosing to use very small filter media such as mini bio-balls or ceramic cylinders you may need to lay a mesh screen over the top of this base. For our bath sponges however our job is almost complete.
Finishing Up
Head back to your sump with the base of your wet dry filter only. Slip the base under your divider, squeezing it into place between the other wall and divider or simple under the divider. I prefer on the inside for extra strength and less used egg crate but it doesn’t affect the end product. Silicone the base into place. Because siliconing each piece of crate is a tedious process I like to silicone only the outer rim at first and leave it to dry for an hour. This makes the silicone strong enough to hold the egg crate in place while you add in the rest of the silicone.
Like with the divider make sure you get every conceivable point of contact between the egg crate and its surrounding walls. If you are using a large tank with high flow you may even need to install supports under the base. With each crack and crevice filled with silicone your job is one step from done.
To finish you will be creating the layer of silicone the top will be resting on. This is the one part that is not attached by silicone. If you were to seal it into place, your wet dry filter would be 100% sealed off. You would never be able to add any filter media or change/clean it. By simply creating the top layer of silicone you can add or remove the drip tray at your continence. Simple follow your mark on all four sides of the wet/dry filter and apply a generous portion of silicone. Make sure this part is extra strong.
The Waiting Game
Now all that remains is to wait for your silicone to dry. Leave it sitting in a well ventilated area, preferably with a fan directed at the wet/dry filter, and leave it be for at least two days. The fan helps the silicone cure much faster. Normally I will allow this to sit for a full week before use. Rinse the sump and put it in your desired location, toss in the sponges and fire it up. You’ve got one of the best pieces of equipment any aquarium owner could own.